


TABLE OF CONTENTS
Introduction to 4pay
To begin setting up Payroll you will need the following information:
1. Employee details: name address, date of birth, contact numbers and email address
2. Employee Tax file number
3. Employee bank details; if you intend using ABA files
4. Superannuation Funds details, including their member number
5. Details of hourly rate/ salary and any other allowances or deductions that may be required
6. If changing from another payroll system you will need opening balances for accruals like personal/sick pay, annual leave and long service leave
PLEASE NOTE: Bizprac support can only provide general information. For information regarding award rates, pay details contact Fairwork, your relevant industry body or the ATO.
Before
Before a pay run can be processed you must check the following information has been entered:
1. Add the Employee details
2. Create the Template wages categories
3. Set the default ledgers
4. Create the employee wage profile
5. Ensure the correct tax scales are selected for the employees
6. Enter the employee superannuation details including the member number
7. Add employee bank details and ABA file location if using ABA files
8. Ensure you have the relevant authorisations for the STP submission
PLEASE NOTE:
The examples contained in these guides are generalised. As each state or industry body have differing legislation; it is up to each individual business to ensure they are meeting their PAYG requirements. The information provided is current at time of publication and may be updated as required.
Activating Payroll
Payroll can be activated individually for each bookset as required. If payroll is not required for a bookset it does not have to be activated.
Under the settings menu go to Payroll and tick the box “Payroll is active for this bookset” This will activate payroll icon in the main Bizprac screen.
Registered to employ Working Holiday Makers; will only be required for STP reporting if applicable.
The added function of hiding employee pays in cash payments is also available. This is then set further in the security setup.

Payroll Features
4Pay will allow you to add new employees, track employee leave entitlements; extensive reporting options as well as Superstream reporting.
The tax scales are automatically loaded and updated each financial year. You must check that the correct tax scale is selected and make any necessary adjustments. The date range shows the financial period payroll is reporting for. For STP reporting the date range MUST be the current financial year.

Definitions
➢ STP: refers to Single Touch Payroll, this is the approved method for reporting to the ATO the payroll when processed
➢ TFN: Tax file number; this will be supplied by your employee at the start of their employment; along with relevant details on the TFN declaration
➢ OTE: Ordinary time earnings, generally this will be the base rate that your employee is paid, and the Superannuation guarantee applies to these amounts
➢ SG: Superannuation Guarantee, this is the compulsory minimum amount that must be paid for your employees' wages
➢ Reportable Super: This is an additional amount nominated by an employee to be paid into their Super Fund. It can be set as Salary Sacrifice or simply as an additional payment
Setup
Before you can begin running payroll you must ensure all of the steps are completed.
1. Enter all employee details
2. Setup all the Templates that will be required
3. Setup the pay profiles for each employee
4. If transitioning from another payroll, add the opening balances for the employees leave accruals
5. Add bank details to the pay split if paying via ABA files
6. Add the details of the Super Funds
7. Enter the admin details for the submission of STP
8. Set the path for the saving of ABA files
9. Add required email details for the emailing of pay slips
10. Set the default accounts
STP2 FAQ
STP should be submitted each time a pay run is completed. Each time a pay run is completed it should be uploaded via STP, ATO standard for submissions is either the last day of the pay week or the pay day (the day that the pay is processed through the bank account)
Ensure the setup of your payroll is correct prior to submitting any pays to the ATO; error checking within the software will prevent incomplete pays from being submitted. Any detected errors will need to be rectified before submitting can be completed.
If you employ Working Holiday Makers (WHM) consult the relevant Bizprac guide to ensure the setup of the employees is correct.
Commonly Asked Questions
Listed below are some of the commonly asked questions; you will find the relevant information in the guides. Alternately you can call our support team for assistance on the issue you have.
My employee has not supplied Super details yet
The details of the employee superannuation fund can be added later; this will ensure accurate reporting for the SG payment (see adding Super details guide)
I made a mistake on a pay run; can it be adjusted?
Once a pay has been processed it may be adjusted if necessary. Certain adjustments may require the STP to be resubmitted to the ATO. (see separate guides)
My employee has had a pay rise, can I adjust the rate of pay?
All the pay rates for employees is controlled in the individual’s details. Highlight the employee, click modify & adjust the hourly rate on the pay details tab.
Payroll Setting
General
There are a number of things that will need to be set prior to running any pay runs or lodging STP or creating SuperStream reports.
Ensuring that all of these areas are set will help to provide a smooth process for payroll as well as for reporting.
Notes can be set to be included on the pay advice for employees. Set reminders for key dates such as Super reporting.
Set the file location for the use of ABA files, as well as emailing of pay advices.
Add and maintain details of the Superannuation Funds.
In the employee’s window, documents can be attached as well as diary notes and normal notes. Reminders can also be set for individual employees.
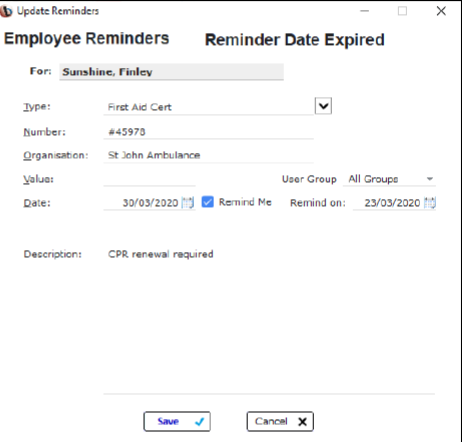
Adding an Employee Reminder
Certain licensing requirements need to be kept up to date. Record reminders for each employee as required.
If your employee has CRP qualifications that need to be renewed yearly; a reminder can be set to keep the information current.
Add the relevant details and set the reminder date.
Once the reminder date falls due; the message will be displayed in your message board in the top right hand corner of your program. Alternately view the list of reminders by clicking on the reminders button.
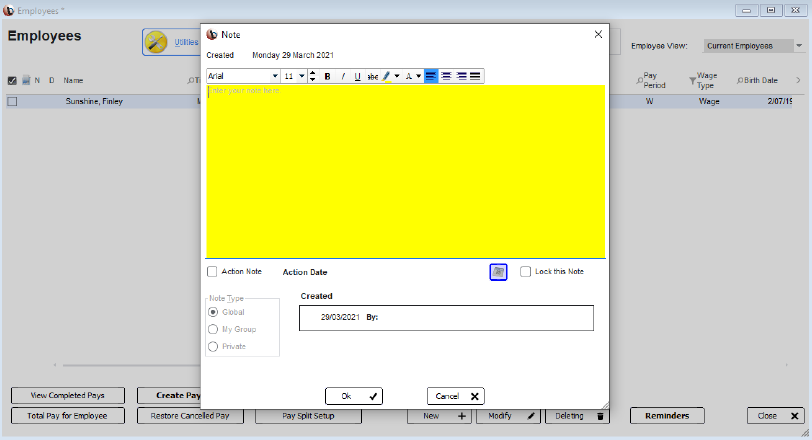
Notes
Click into the Note column and this will activate the Notes option.
Add the relevant information for the note.
If you would like to make the note an action note; choose the date for the reminder.
Notes can also be assigned to groups if required.
Diary Function
A diary function is available for each employee.
An entry can be added; once added to the list it will be date & time stamped.
You can add as many entries as required.
It should be noted that the entries cannot be adjusted or deleted.

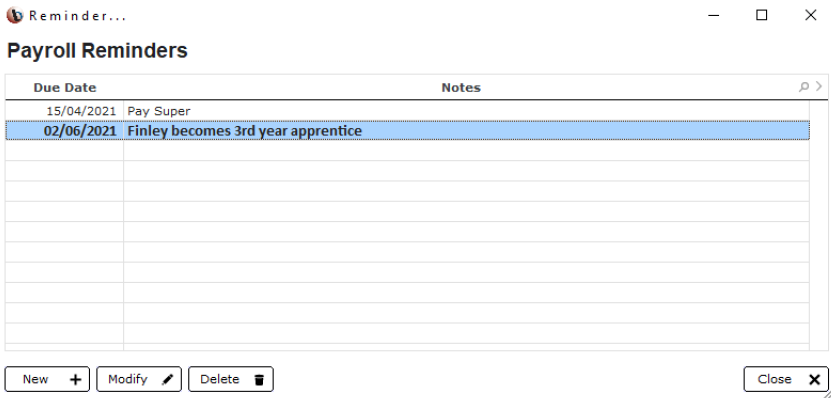
Payroll Reminders
Payroll reminders can be set for a variety of things.
Pay super
Check an employee status
Reminder date for a change in Apprentice status
Once set these reminders will appear when the pay run is started.
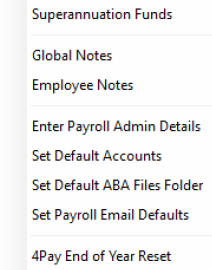
Settings
The settings menu is used to setup information for Super Funds (separate guide available)
Global and employee notes can also be accessed under this menu.
The defaults for payroll should be set here; these should be completed prior to running a pay run and lodging STP or SuperStream.
4Pay end of year reset only needs to be completed at the end of the financial year. Please refer to the separate guide for this process.
Admin Settings
Add the payroll admin details.
This will generally be the person completing the pay roll process.
Add the name as well as the contact details of the person who will be reporting Super Stream.

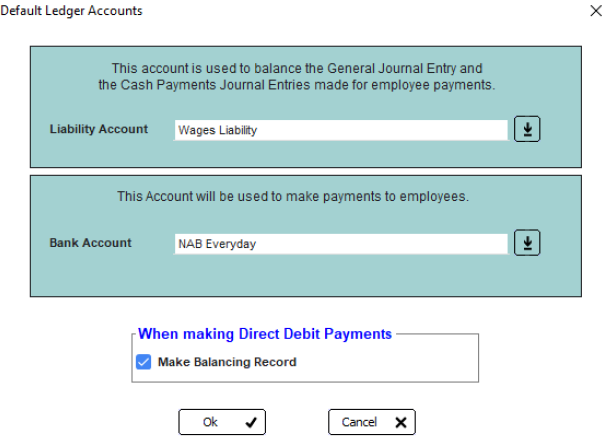
Set Default
Set the default balancing account for the wages.
Select the bank account that pays will be made from.
If you plan to create ABA files for payment tick make a balancing record.
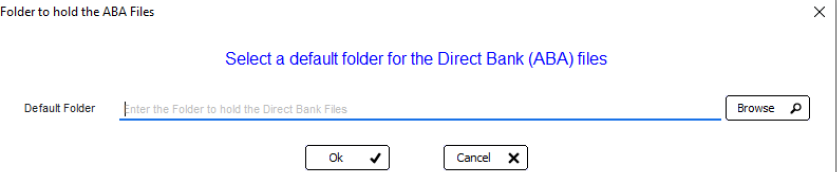
Set the path for the ABA files to save to; this could be to a folder on a local drive or on a shared drive.
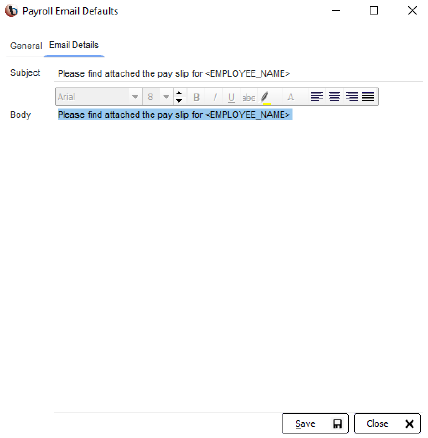
Email Defaults
You can cc an additional email for a payslip or add an attachment to be sent with the payslips.
If necessary the wording of the emails sent can be adjusted.
Once all of the changes have been made, click save.

Adding Employee Details
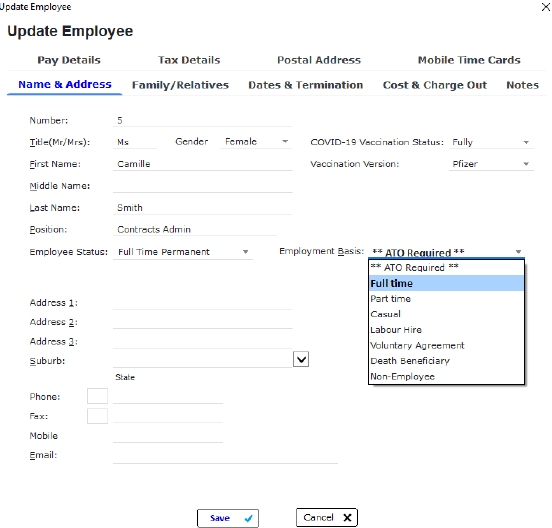
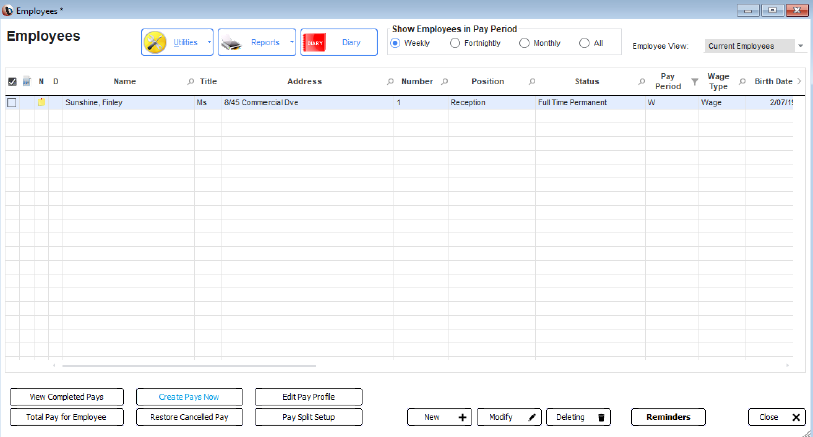
Employees
Click on employees to open the employee screen. In this screen you can add employees, setup employee profiles, set reminders, add documents, notes and the diary function can be used to record information for the employees.

New Employee
An employee number will automatically be added, if transferring over from another payroll system you may use the employee number previously assigned.
Ensure you fill in each of the appropriate drop down fields.
Add the relevant address details, contact numbers and email address.
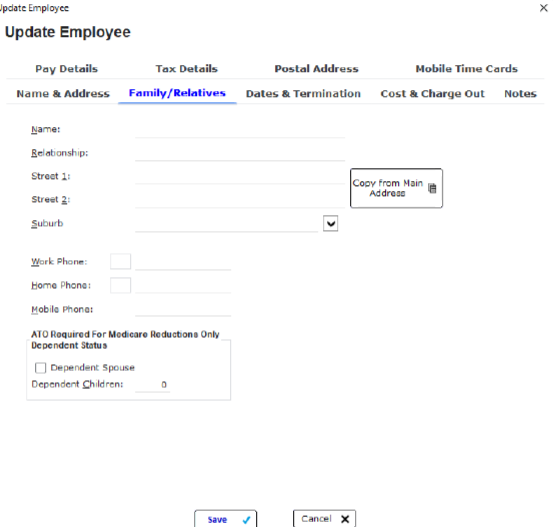
Family/Relatives
Adding details on the Family/Relatives tab will store contact details for the employees family.
This will provide details should an emergency arise.
Details of dependant spouse & children can be added if the employee is claiming a Medicare reduction or exemption.
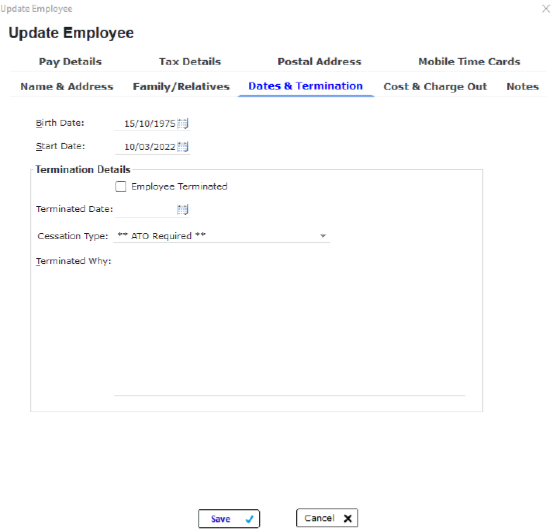
Dates and Termination
Adding details on the Family/Relatives tab will store contact details for the employees family.
This will provide details should an emergency arise.
Details of dependant spouse & children can be added if the employee is claiming a Medicare reduction or exemption.
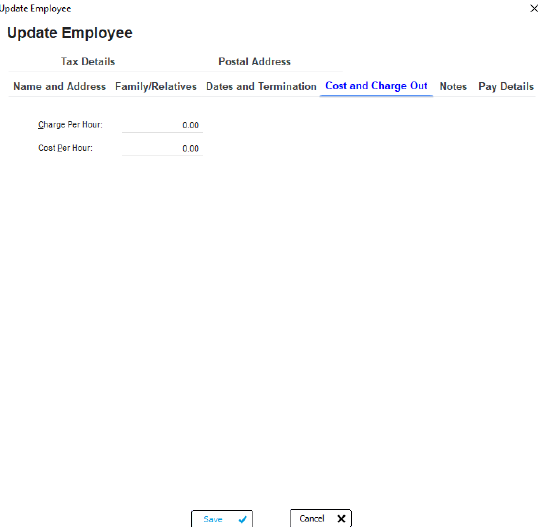
Cost & Charge Out
A charge out cost and base cost can be entered in this tab. These figures will be used by default in time card entry.
The charge out rate can be set to suit the level of experience if required.
The cost rate should reflect the true cost of your employee; this should include super, any allowances the employee may be paid and any relevant insurances.
For a simple calculation a general percentage can be added to their hourly rate. Also refer to the Cost or Charge out Guide.
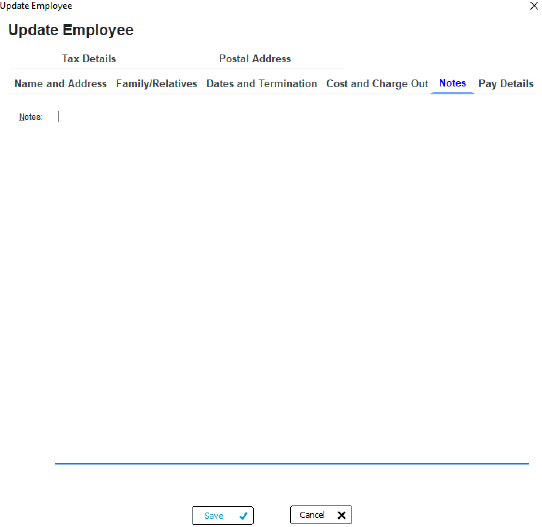
Notes
Notes can be added for each employee as required.
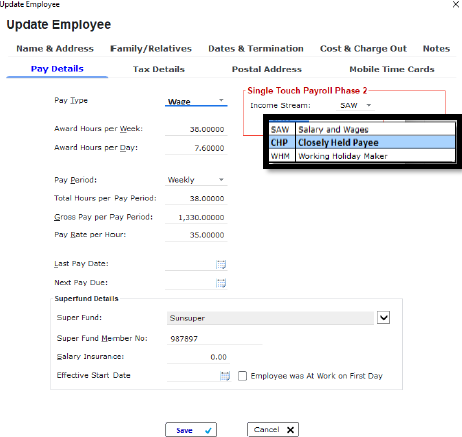
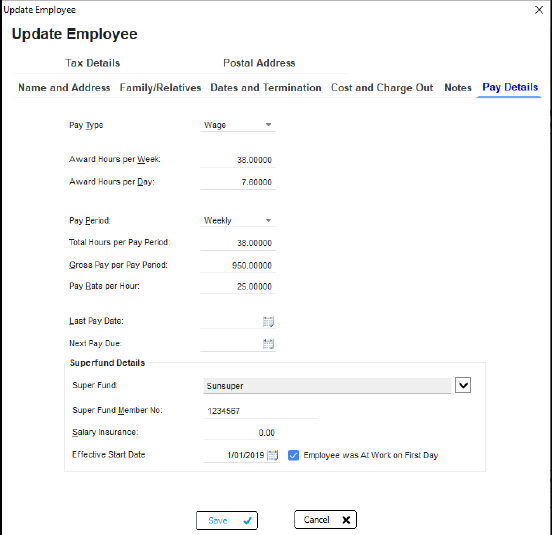
Pay Details
Select the pay type of either wage or salary.
Add the hours per week; if the employee is casual add the minimum hours the employee will work over the pay period. Set the hours per day, in the case of a casual it can be an average.
Select the pay period of weekly, fortnightly or monthly.
Add the total hours per pay period.
Adding in the hourly rate will calculate the gross amount for the pay period.
Ensure the Superfund and employees member number is added.
Select the relevant Income allocation from the drop down box. Bizprac only supports 3 options.
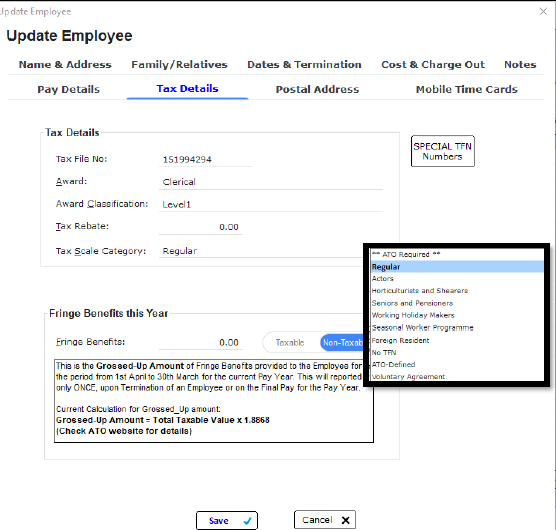
Tax Details
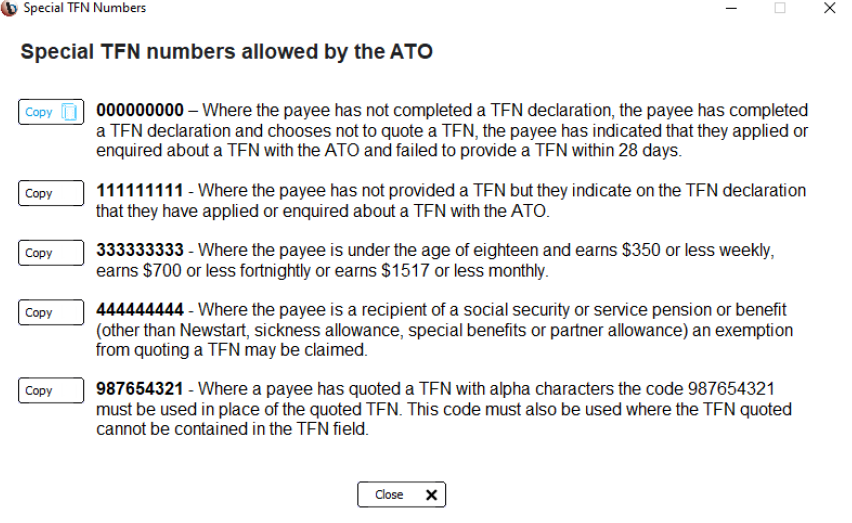
Add the employees Tax File Number, if the employee does not have a Tax File number or is applying for one refer to the Special TFN Numbers refence.
The details of the award and award classification the employee is being paid under can be added. These details will display on the employee’s pay slip.
If a tax rebate applies, the employee will have the relevant details as supplied by the ATO.
Select the tax scale category from the drop down list.
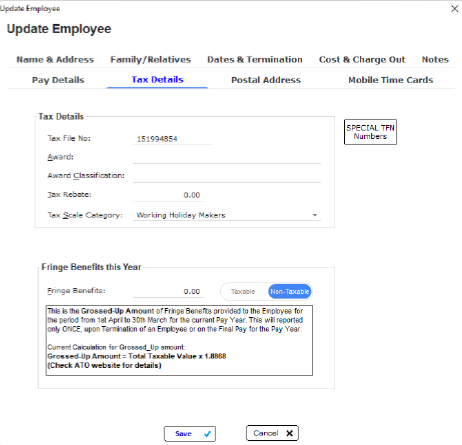
If your business has an FBT obligation the details once calculated will be entered here.
TFN Subs
Normally upon employment an employee will complete a TFN declaration. In rare cases they may not provide a TFN; in this circumstance the listed subs can be used.
Each circumstance will need to be assessed and select the relevant TFN that applies.
Don’t forget to adjust once the employee has supplied the correct TFN.
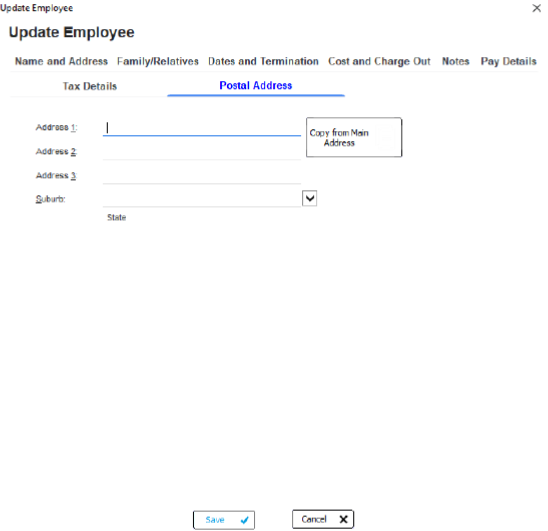
Postal Address
Add postal details if different from the main address.
Once all of the details have been added to each tab; click save to finalise adding the employee.
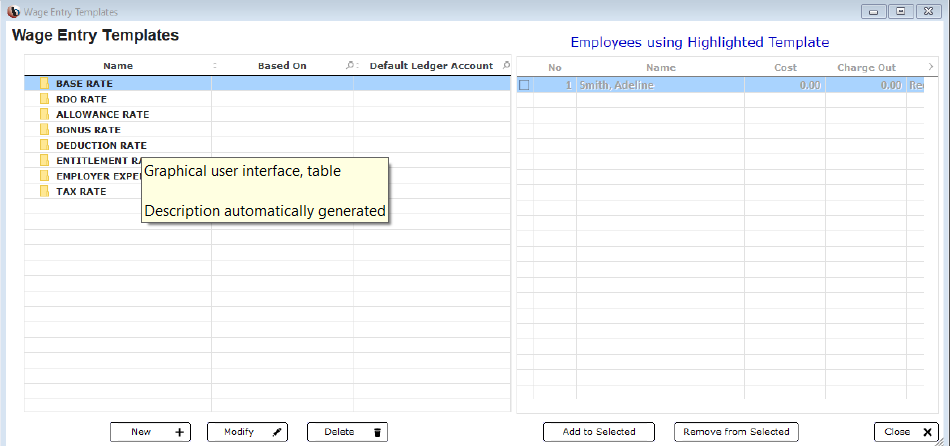
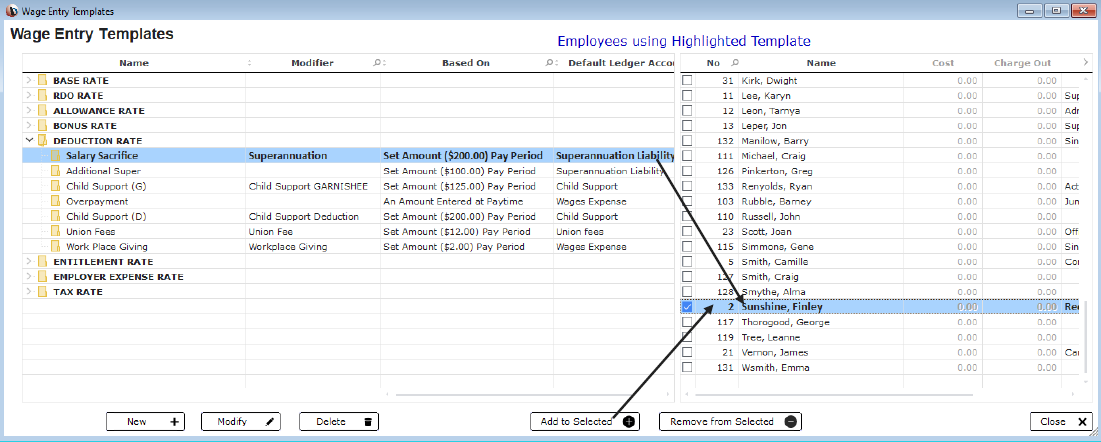
Wage Entry Templates
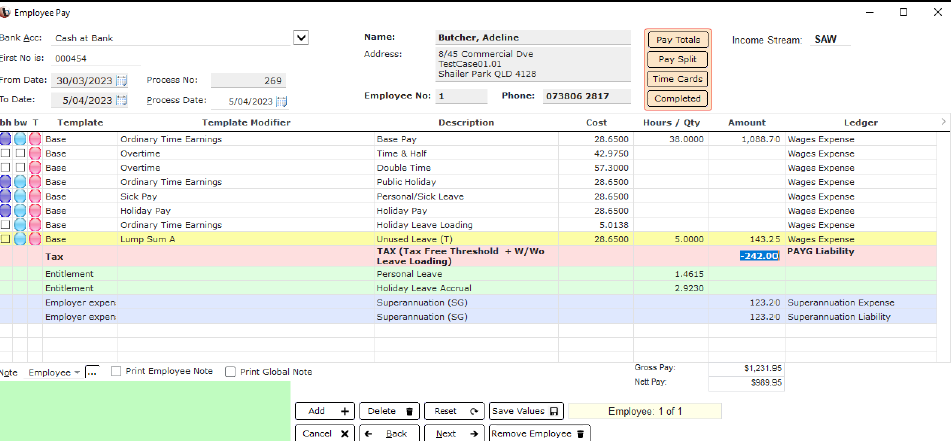
Wage entries are the components that make up an employee's wage. It is best to keep the wage categories simple. Start with the basics, additional wage entries can be added as required. Any increase to the employees' hourly rate is applied through the employees pay profile.
Suggested wage categories:
➢ Base wage
➢ Casual rate
➢ Salaried
➢ Time & half
➢ Double time
➢ Public Holiday
➢ Annual Leave (Holiday)
➢ Personal Leave (Sick)
➢ Leave Loading
➢ RDO pay
➢ Parental Leave
➢ Long Service Leave
➢ Bereavement/Compassionate Leave
Enter the Templates
Open the Templates window.
From this screen you will add, change or delete wage rates.
To begin click on the folder and click new to begin.
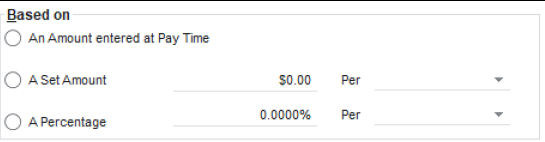
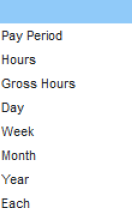
Based on Options
Use this to set the way the pay is calculated.
An amount at time of pay: an amount will be entered at the time of pay processing.
Set amount: is an amount the is specified based on one of the drop down options.
Percentage options: this option is usually used for an hourly rate and the most popular option.

Used for Options
Most pay templates added will need to have a “used for” option selected.
Some options such as the Lump Sums will be used in association with termination payments.
Refer to the ATO website for clarification of the relevant selection.
Please note this guide is general only and may not reflect your individual circumstances. Always refer to the ATO or your Accountant for clarification if in doubt.

View
Once the modifiers have been added this is how the screen will look.

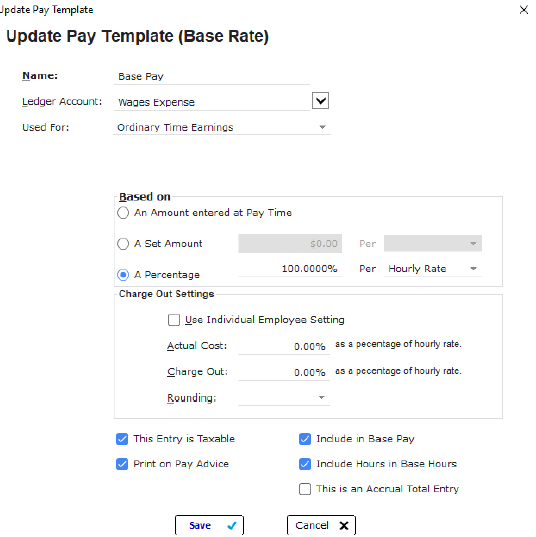
Base Rate
Begin by add the name of the wage rate; select the ledger account for the wages.
Select the relevant modifier from the drop-down box.
Select how the pay will be calculated.
Charge out settings will need to be selected for timecard usage.
Select the boxes for taxable and print on pay advice.
Include in base pay, this allows for the calculation of superannuation.
Include in base hours allows for the calculation of leave accruals.
Casual Rate
Add the name for the wage rate, indicating that it includes any loading.
Select the wage expense ledger account & the relevant modifier.
Based on 100% of the hourly rate.
Charge out settings will need to be selected for timecard usage.
Tick that the entry is taxable and to print on the pay advice.
Tick to Include in base pay, this allows for the calculation of superannuation.
No other boxes should be ticked unless leave accruals apply.
Time & Half
Add the name of the rate and select the wages expense ledger account. From the drop-down box select overtime.
As a percentage the rate will be 150% of the hourly rate.
Charge out settings will need to be selected for timecard usage.
Select the boxes for taxable and print on pay advice.
Since super & accruals do not apply for overtime, do not check the additional boxes.
Double Time
Add the name of the rate and select the wages expense ledger account. From the drop-down box select overtime.
As a percentage the rate will be 200% of the hourly rate.
Charge out settings will need to be selected for timecard usage.
Select the boxes for taxable and print on pay advice.
Superannuation & accruals do not apply for this entry; so, there is no need to check any additional boxes.

Public Holiday
Begin by add the name of the wage rate; select the ledger account for the wages. Select ordinary time earnings from the drop-down box.
Select how the pay will be calculated.
Charge out settings will need to be selected for timecard usage.
Select the boxes for taxable and print on pay advice.
Include in base pay, this allows for the calculation of superannuation.
Include in base hours allows for the calculation of leave accruals.
Personal/Sick Leave
Begin by add the name of the wage rate; select the ledger account for the wages. Select ordinary time earnings from the drop-down box.
Select how the pay will be calculated.
Charge out settings will need to be selected for timecard usage.
Select the boxes for taxable and print on pay advice.
Include in base pay, this allows for the calculation of superannuation.
Include in base hours allows for the calculation of leave accruals.
Tick this an accrual entry for the calculation of leave.
Holiday Pay
Begin by add the name of the wage rate; select the ledger account for the wages. Select ordinary time earnings from the drop-down box.
Select how the pay will be calculated.
Select the boxes for taxable and print on pay advice.
Include in base pay; this allows for the calculation of superannuation.
Include in base hours; allows for the calculation of leave accruals.
Tick this an accrual entry for the calculation of leave.

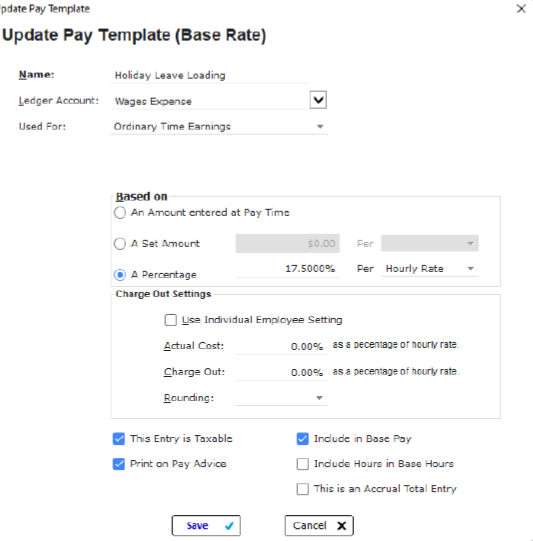
Leave Loading
Begin by add the name of the wage rate; select the ledger account for the wages. Select overtime from the drop-down box.
Select how the pay will be calculated.
Select the boxes for taxable and print on pay advice.
Include in base pay, this allows for the calculation of superannuation***
***Super on leave loading may be required on some awards, refer to the award/ Fairwork for clarification
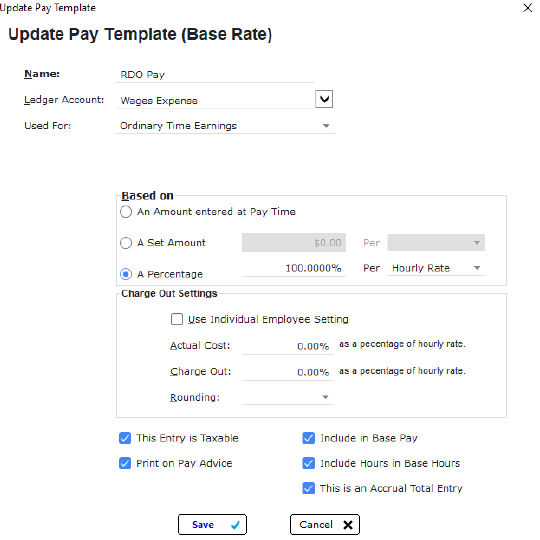
RDO
Begin by add the name of the wage rate; select the ledger account for the wages. Select from the drop-down box.
Select how the pay will be calculated.
Select the boxes for taxable and print on pay advice.
Include in base pay, this allows for the calculation of superannuation.
Include in base hours allows for the calculation of leave accruals.
Tick this an accrual entry for the calculation of RDO accrual.
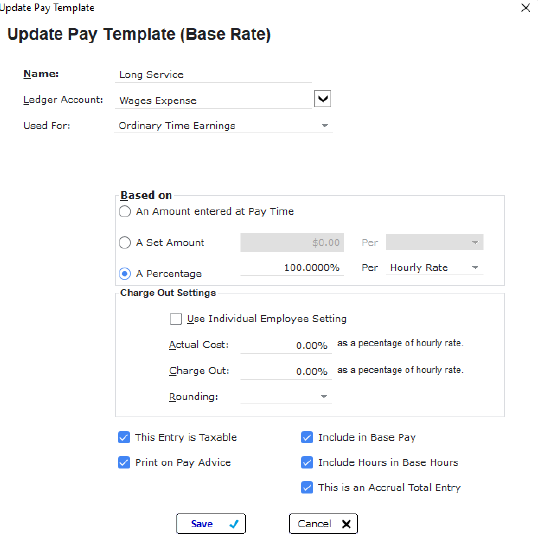
Long Service
Begin by add the name of the wage rate; select the ledger account for the wages. Select ordinary time earnings from the drop-down box.
Select how the pay will be calculated.
Select the boxes for taxable and print on pay advice.
Include in base pay, this allows for the calculation of superannuation.
Include in base hours allows for the calculation of leave accruals.
Tick this an accrual entry for the calculation of long service accrual.
Additional Rates
Other template options can be added as required they may include:
➢ Compassionate/Bereavement Leave
➢ Parental Leave
➢ Cash out of Leave
➢ Workers Comp
➢ ETP*
➢ Redundancies*
*Refer to the relevant guides; please don’t hesitate to call the support team for guidance in setting up any of these rates.
RDO Rates
Add RDO and select where the RDO will accrue to; as well as the template it will deduct from.
Enter the number of hours each week to accrue *
*There are 2 options for RDO accrual
1. A set number of hours can accrue each week
2.The RDO accrual only applies if the employee exceeds their base hours
Select to print on pay advice and to carry over to the next year

Allowances
Allowances will fall into several categories. The ATO has set guidelines as to how these should be treated & reported in STP.
1. Allowance that compensates for specific work conditions; wet weather, height etc.
2. Allowances paid for specific qualifications
3. Allowances to cover work expenses
*See the Guide for Allowances for more detailed information in setting these up.
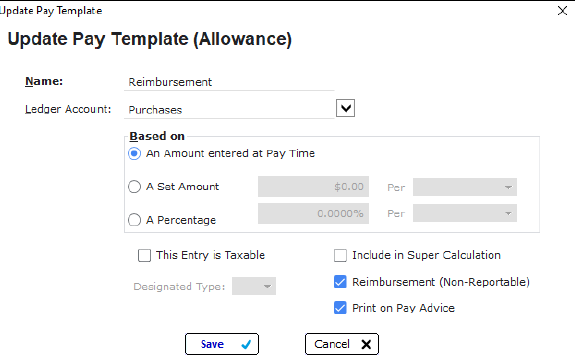
Reimbursement
A reimbursement is a payment made to the employee for purchases they have made on behalf of the company.
They do not form part of the employee’s wages and should be allocated to an expense ledger account.
Print on the pay advice and tick as a reimbursement.
These payments do not appear on the employee’s income statement.
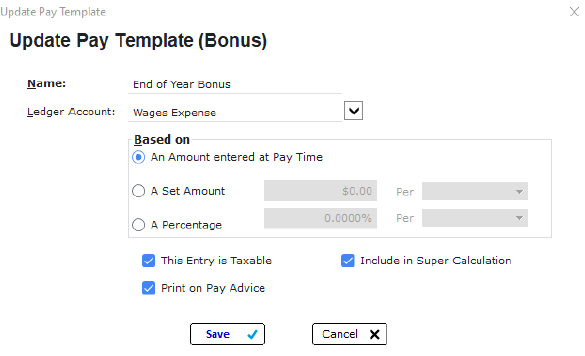
Bonus Rate
Add the name of the bonus being paid.
Enter the wages expense ledger.
Select how the bonus will be paid.
Check the boxes for taxable, print on pay advice and super calculation if super is applicable.
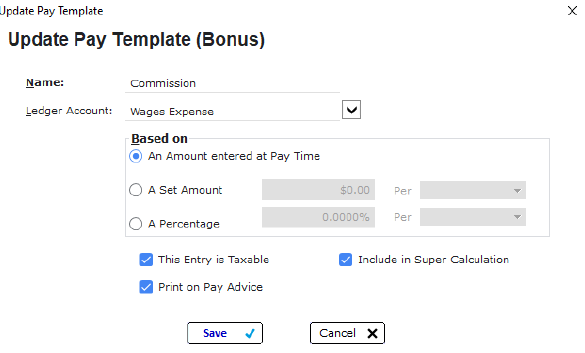
Commissions
Add the name of the commission being paid.
Enter the wages expense ledger.
Select how the bonus will be paid.
Check the boxes for taxable, print on pay advice and super calculation if super is applicable.
Deductions
There may be several reasons for a deduction to be setup. They include salary sacrifice, child support and additional tax.
Add the name of the deduction, selecting the relevant ledger account.
Set how the deduction will be calculated, ensuring the relevant drop-down boxes are correct.
Check the boxes for print on pay advice and reportable superannuation.
** Reportable Superannuation will show on an employee’s income statement.
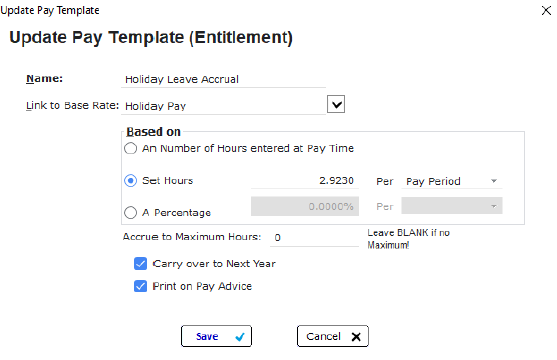
Annual Leave Entitlement
Add the name of the entitlement; select the corresponding base rate to link back to.
Set how the leave will accrue; set hours per pay period will accrue a set number of hours regardless of hours worked. Calculation as a percentage will calculate the base hours worked for both full time and part time employees.
Check carry over to next year as well as print on pay advice.
** Note only one leave accrual can be linked to a base rate. Multiple accruals will require corresponding base rates.
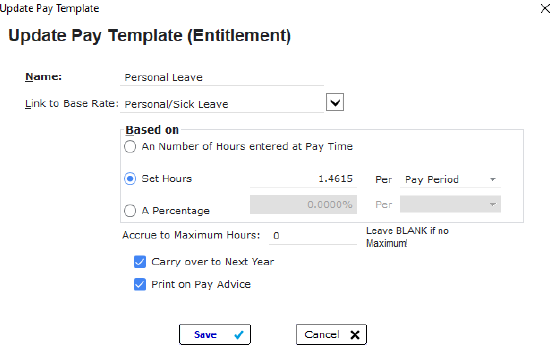
Personal/ Sick Leave Entitlement
Add the name of the entitlement; select the corresponding base rate to link back to.
Set how the leave will accrue; set hours per pay period will accrue a set number of hours regardless of hours worked. Calculation as a percentage will calculate the base hours worked for both full time and part time employees.
Check carry over to next year; optional to print on pay advice.
** Note only one leave accrual can be linked to a base rate. Multiple accruals will require corresponding base rates.
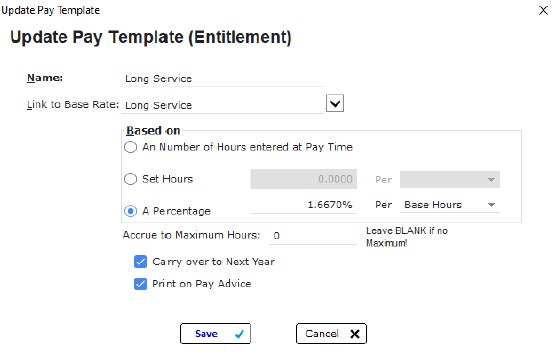
Long Service Entitlement
Add the name of the entitlement; select the corresponding base rate to link back to.
Set how the leave will accrue; set hours per pay period will accrue a set number of hours regardless of hours worked. Calculation as a percentage will calculate the base hours worked for both full time and part time employees.
***Ensure you set the calculation for the state/ territory for your business.
Check carry over to next year; optional to print on pay advice.
** Note only one leave accrual can be linked to a base rate. Multiple accruals will require corresponding base rates.
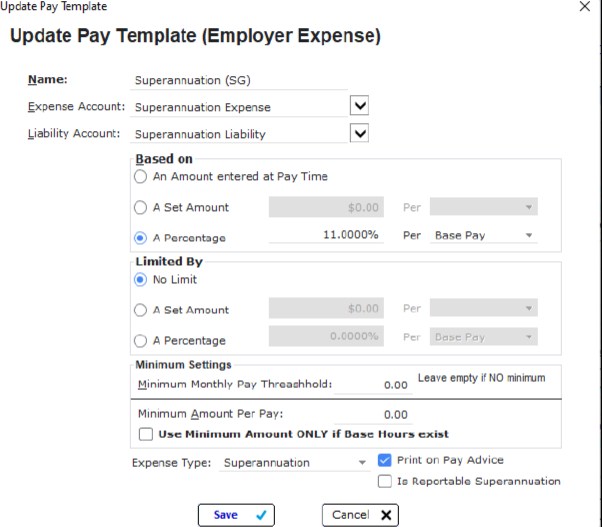
Employer Expense
This rate will calculate the superannuation guarantee; there is no need to setup multiple superannuation templates.
Add the details for Superannuation
Set the relevant expense and liability ledgers.
Select how the super will be calculated, if there is an increase in the percentage it can be adjusted here.
Set the expense type from the drop-down box and print on pay advice.

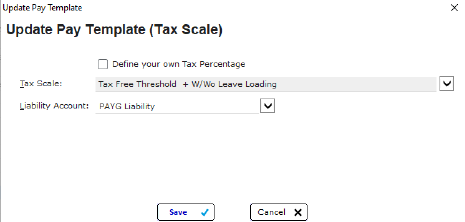
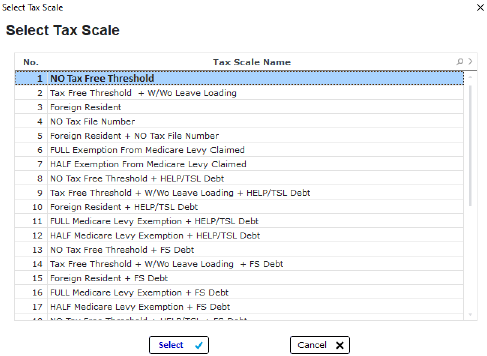
Tax Rate
Tax scales are automatically updated on July 1st each financial year. You will need to ensure the correct rates are selected.
From the drop-down box select the relevant tax scale.
Add the liability ledger.
You may add as many scales as necessary; only one scale should be added to each employee profile.
Should any changes be required; remove the first scale applied to the employee and replace it with the change.
Definable Rate
If a defined tax scale is required one can be setup.
These types of defined rates will be outlined in an official notice from the ATO & will be provided to you by your employee.
Select from the drop down the reason for the variation and then set how the scale will be calculated.

Set the Employee Profile
The Employee Profile
The employee profile will allow you to add wage templates and build up the pay profile (how the employee will be paid)
You will be able to individualise each profile to suit the employee; ensuring all leave entitlements, as well as super are calculated correctly.
A pay profile also allows for the setup of salaried employees.
If you are thinking of applying a pay increase you can use the pay profile to check the increases on overall wage & Super obligations etc.
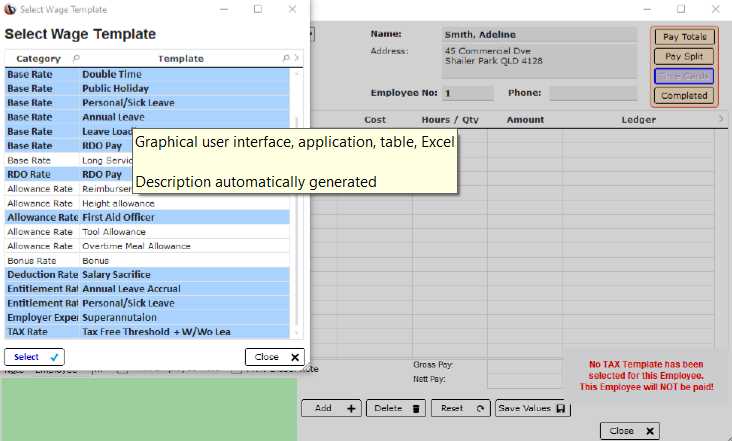
Adding the Wage Rate
Highlight the employee click on “edit pay profile”
Click on the add button; this will open the list of wage templates.
Begin by highlighting the templates you wish to add to the employee.
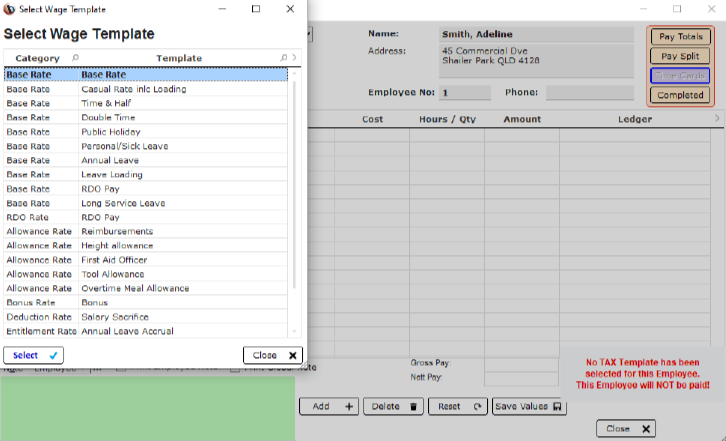
Select Wage Templates
You can select either one by one or hold the Ctrl key and select multiple rates.
Once you have selected all of the relevant rates click select.
Adding the Wage Rates
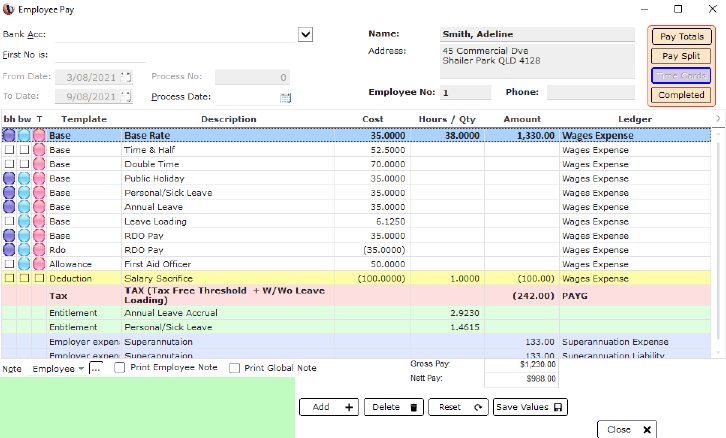
Once you have the required wage rates in the profile you can begin adding or adjusting additional information.
Pay Details
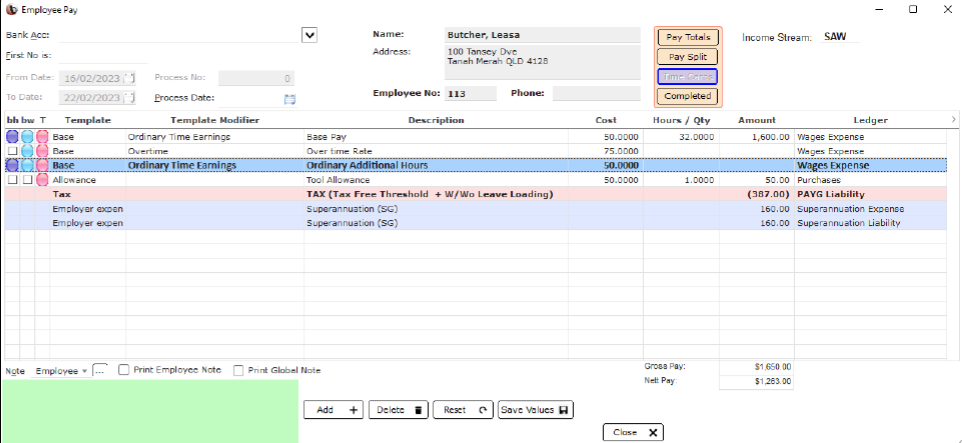
By adding the hours in the hours column you will see how the pay will calculate.
Check that the leave accruals and superannuation are calculating correctly.

Adding Salary Sacrifice
Any deduction associated with salary sacrifice MUST sit above the PAYG line.
For further information regarding salary sacrifice refer to the relevant guide.
Once the profile is setup click the save button. Repeat the same process for each employee.
Column Legends
Each of the columns can be adjusted depending on the requirements.
BH: will be used to calculate the accrual hours for leave as well as RDO’s.
BW: will need to be checked for the calculation of super
T: means that the selected rate is taxable.

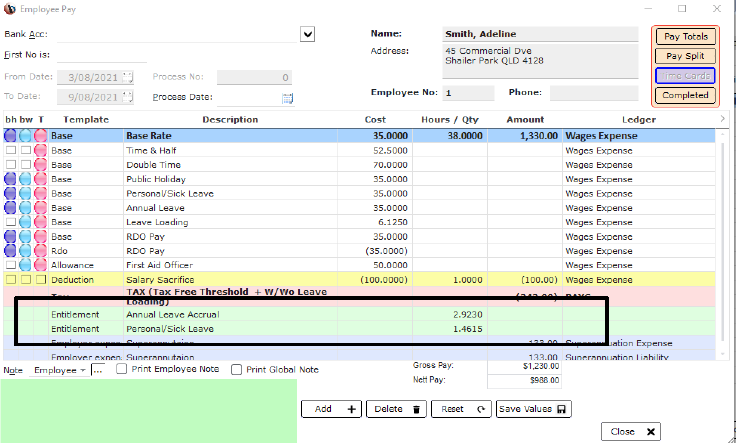
Accruals
Any accruals added to the profile will display and calculate each time a pay run is processed.
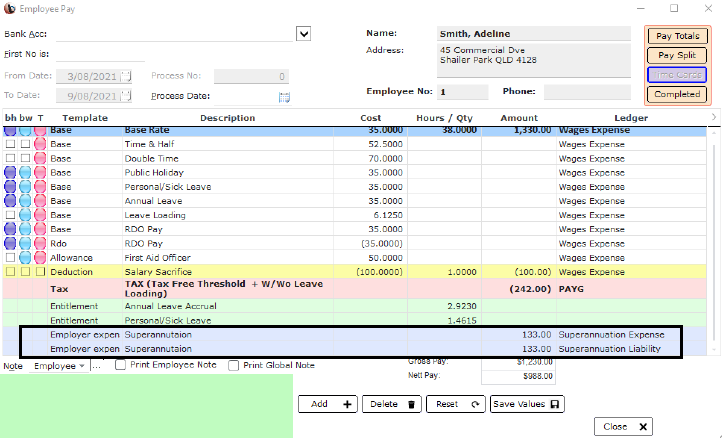
Superannuation
The amount of Superannuation will be calculated each pay based on the wage rates that Super applies to.
You can adjust the Super calculation for the individual base rates by adjusting the BW column.
Once you have added all of the wage rates click save to finalise the pay profile.
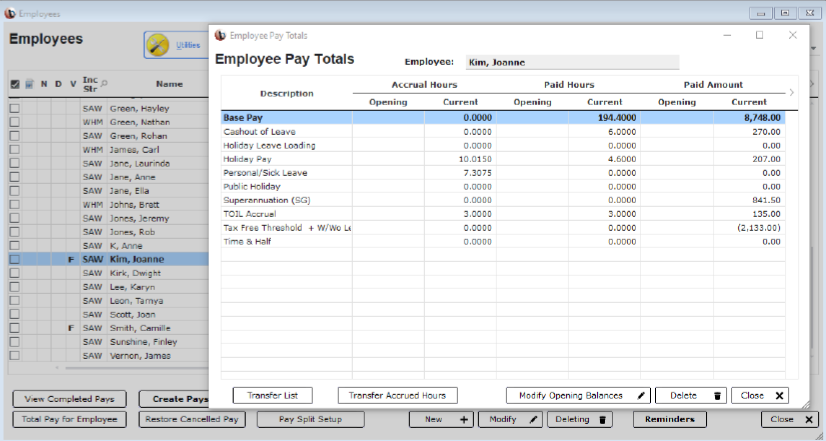
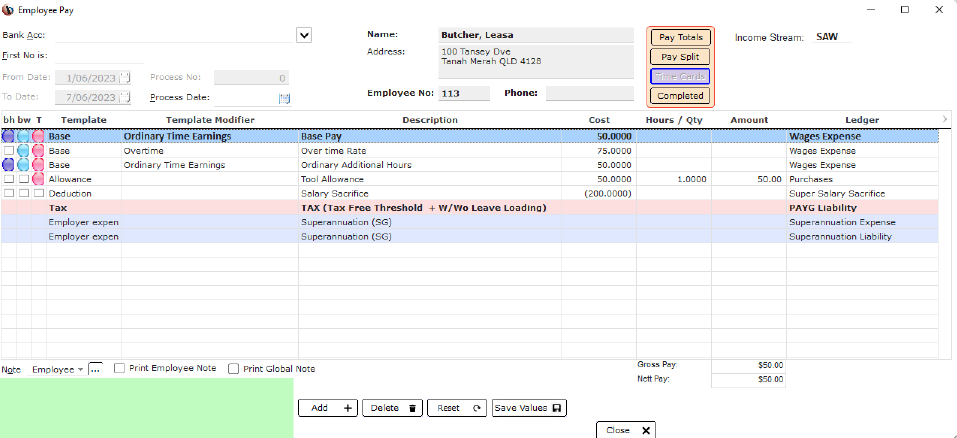
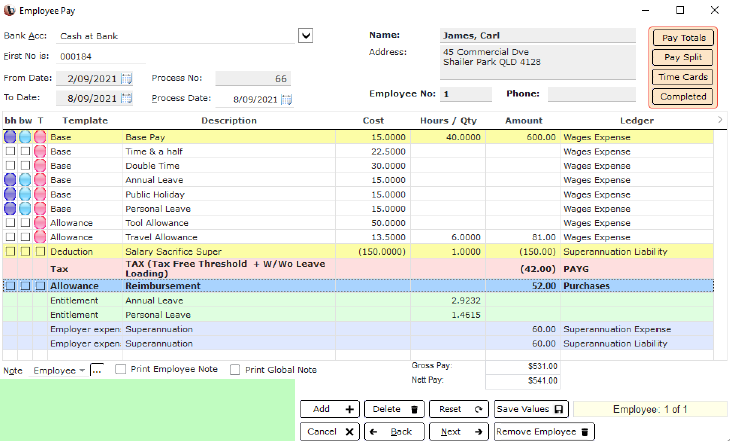
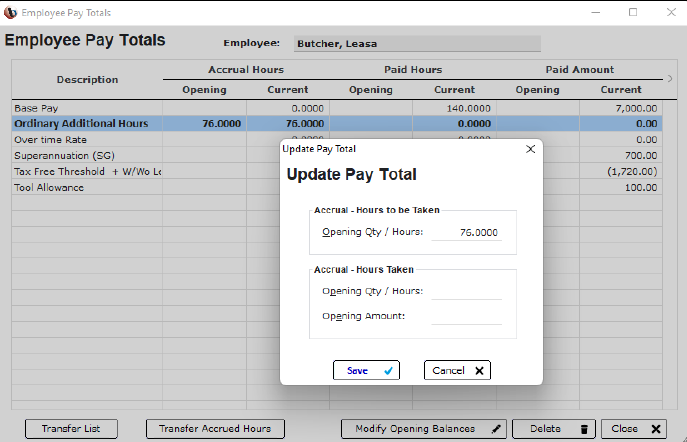
Employee Pay Totals
By clicking on the Total Pay for Employee button, you can at a glance see the totals for each rate.
These totals adjust automatically with each pay processed.
Super Guarantee
The Super Guarantee
The Super Guarantee, as of July 1st, 2023, will be 11%, it can be set to automatically calculate for each employee on the relevant base pay or OTE. A super template can be set up in the employer expense wages templates; if the percentage rate changes you only need to make one adjustment. Reporting will report for each employee not only the amount to report but the details of the Super Fund.
You will need to ensure:
1. Each employee has a nominated super fund
2. The member number for each employee is entered (recorded under the Pay details tab of each employee)
3. Full details for each super fund are recorded (found under the Settings button)
Adding the Super Funds
You will find the Super Funds under the settings drop down.
In this screen you will add the details of the Super Funds.
From this screen you can add, modify or delete details.
If you plan to use a Super Clearing House be sure to add all the required details; otherwise, you may have difficulties uploading the file.

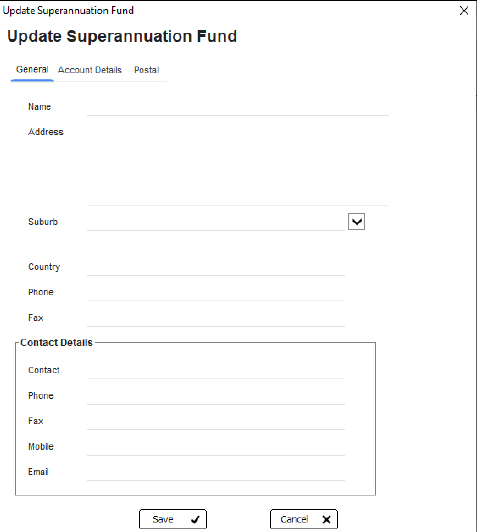
Update Super Fund
Add the name of the fund, along with the address and contact numbers.
If you have a fund manager or a dedicated person who manages your account; add their contact details.
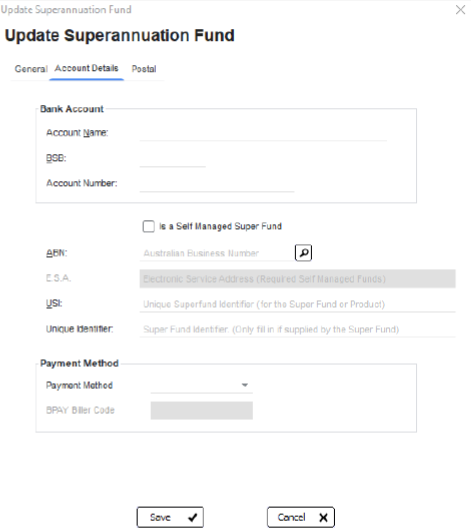
Account Details
Each Super Fund will have an ABN as well USI number that will need to be added.
The Unique Identifier only needs to be added if the Super Fund advises.
Select the preferred payment method.
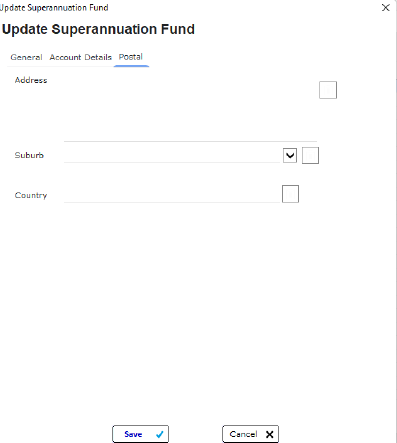
Postal Details
Use the copy buttons to copy the address if the postal address is the same as the physical address.
If not add the postal address details; once complete click save to verify the record.
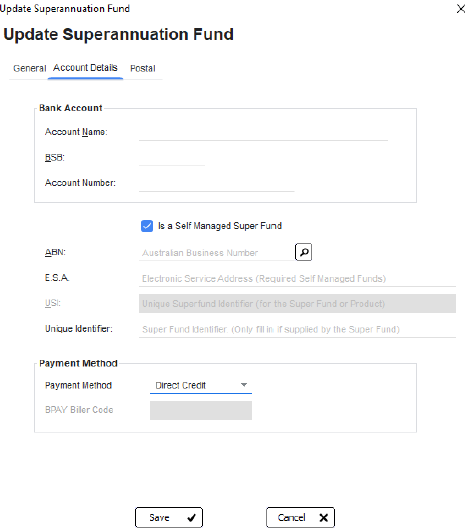
Self Managed Funds
Any employee who has a self-managed super fund will need to provide details.
If paying by direct credit you will need the bank account details of the fund.
Tick that it is a self-managed fund, and the required fields will be highlighted.
Add the ABN as well as the E.S.A (Electronic Service Address) you may also need a Unique Identifier.
Ensure all the other tabs are completed and click save to verify the record.
Adding Employee Details
Highlight the employee and click modify, select the Pay Details tab.
Under Super Details select the employee’s Super Fund.
Add their member number.
Details for the salary insurance and effective start may not be required for each fund. Your Fund will advise if they require these details.
Superannuation Template
Setup the Superannuation template under the Employer Expenses.
Add the name of the expense and select the relevant expense and liability accounts.
Usually, super is calculated as a percentage of the base wage.
Select the expense type to Superannuation and tick print on pay advice.
Adding Super Fund to History Pays
Super details can be added to history pays. View completed pays and select/ filter the employee.
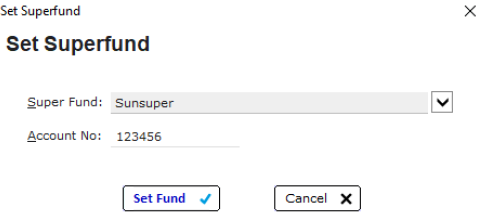
Highlight all the required pays, from the drop-down list under the utilities menu select “Set highlighted pays to Superfund”
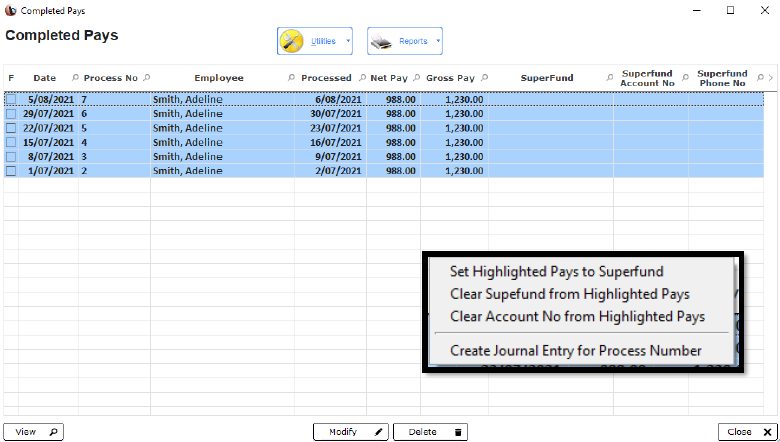
Super Fund Detail
Select the Super fund from the drop-down list and add the employee's member number. The details of the Superfund will be added to the history pays.

Superstream
Superstream reporting is found under the reports menu.
Select the period you wish to report for. Reporting periods are automatically broken down into the quarter or alternately or you can do by date range if you would like to report monthly.
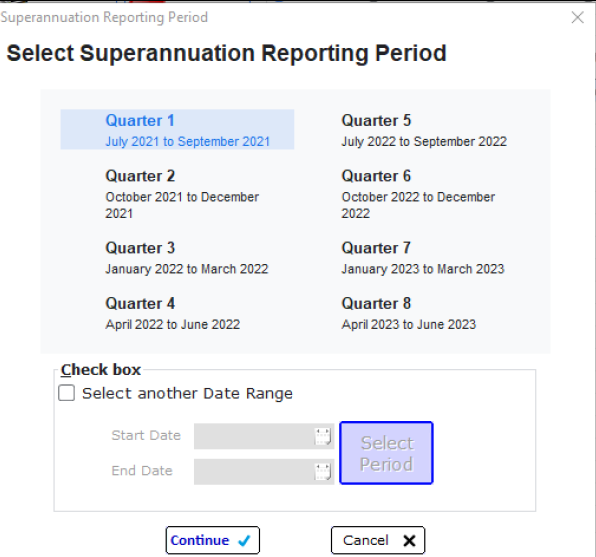
Details
Enter the transaction number for the clearing house; this will be the number provided to you.
Select where to save the .csv file to; make it an easy location to access for upload.
If any details are incomplete, you will get notification of the areas to rectify. Once those details are updated regenerate the file and upload to the clearing house.

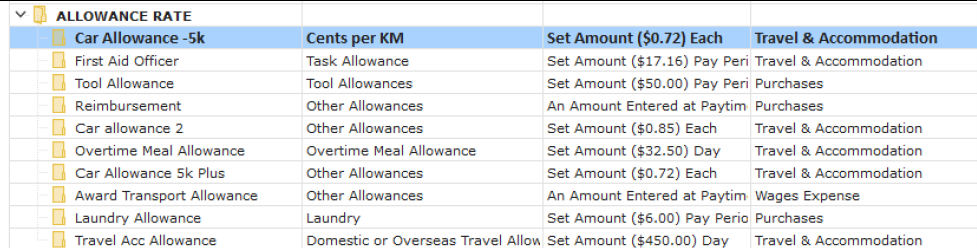
Allowances
Things to Remember
Allowances are generally paid to compensate an employee for a number of different conditions; such as weather, height, qualifications or to cover anticipated work expenses.
You will need to determine why the payment is being made to ensure the treatment of the allowance is correct. Some allowances will be taxed and form part of the employees gross, as well as in some cases have super included.
The ATO collates allowances into 3 categories.
1. Allowance to compensate for working conditions; such as wet weather, dirt or height
2. Allowances paid for qualifications; such as first aid etc
3. Allowances to pay for work expenses; such as tool, car etc.
* This information relating to allowances is current at time of publishing and will be subject to change. If you are unsure as to how any allowance should be treated contact the ATO; advice on what allowances should be paid can be obtained from Fairwork or the relevant industry body in your state.
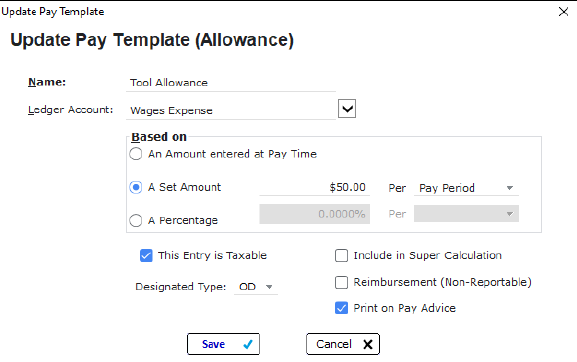
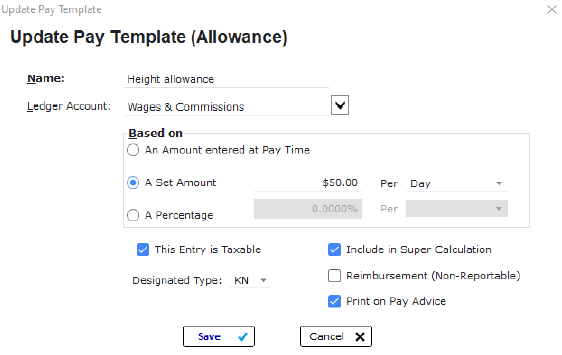
Specific Working Conditions
These allowances will be included in the employees gross pay and will be taxed. If these allowances form part of the employees ordinary time earnings (OTE) super will apply also.
Add the name of the allowance selecting the wages expense ledger.
Select how the allowance will be paid.
Tick that the entry is taxable, print on pay advice and if Super applies, tick include in Super calculation.
Special Qualifications
If these allowances are to be included in the employees gross pay they will be taxed. If these allowances form part of the employees ordinary time earnings (OTE) super will apply also.
Add the name of the allowance selecting the wages expense ledger.
Select how the allowance will be paid.
Tick that the entry is taxable, print on pay advice and if Super applies, tick include in Super calculation.

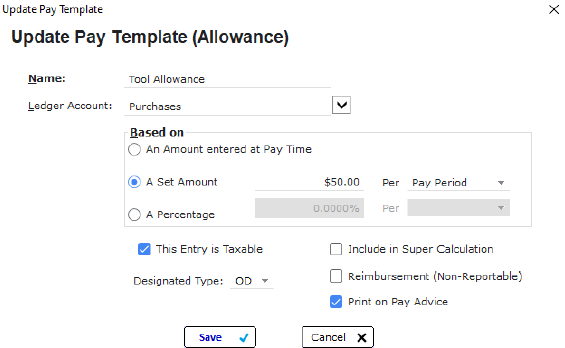
Taxable Work Expenses
Work expense allowances are paid toward covering work related expenses such as tools, travel etc.
These allowances are generally taxable but no super applies.
Add the name of the allowance selecting how the allowance will be paid.
Tick that the allowance is taxable and print on pay advice.
Taxable Options
Allowances that are taxable will fall into one of the 2 displayed options.

Non- Taxable Allowances
A non-taxable allowance will cover circumstances during the course of the work period such as a travel allowance, meal allowance.
They will generally not be taxed, will not be included in the super calculation, nor do they form part of the employees gross wage.
Add the name of the allowance and select the relevant ledge; this can be an expense ledger as it should not be included as wages.
Tick print on pay advice. It should be noted that these allowances are not reported separately on the employee’s income statement.

Non- Taxable Options
Non taxable allowances will fall into one of the listed categories.
If you are unsure of where the allowance you wish to pay falls into please consult the ATO website for further information.

Examples
In this list are some examples of the types of allowances. The use of these will vary from company to company.
Payroll Processing
Create a Pay Run
To begin a pay run, select the pay period you will be paying; weekly, fortnightly or monthly.
All employees in the same pay period should be paid within one pay run.
If you are terminating an employee it would be best to run a separate pay run for that employee. (Refer to the relevant guide)
Click on “create pays now”
Pay Run Setting
The pay settings screen will show the dates of the pay year. Pay dates, it is important to get these dates accurate.
Pay ending: will be the date of the last day of the pay cycle. For example if your pay week runs, Wednesday to Tuesday; the date you enter will be Tuesday’s date.
Process date: this is the date that the pay run is processed and the payment leaves your bank account.
Select the employees you wish to pay.
If time cards have been used they can be imported.

Check Settings
At this screen you can re-check dates and details of the bank account as well as the file path for the ABA file if you are using one.
If anything is incorrect or needs adjusting click the back button and make the necessary adjustments.
Once you are happy with the dates and settings click “Create pays now”.

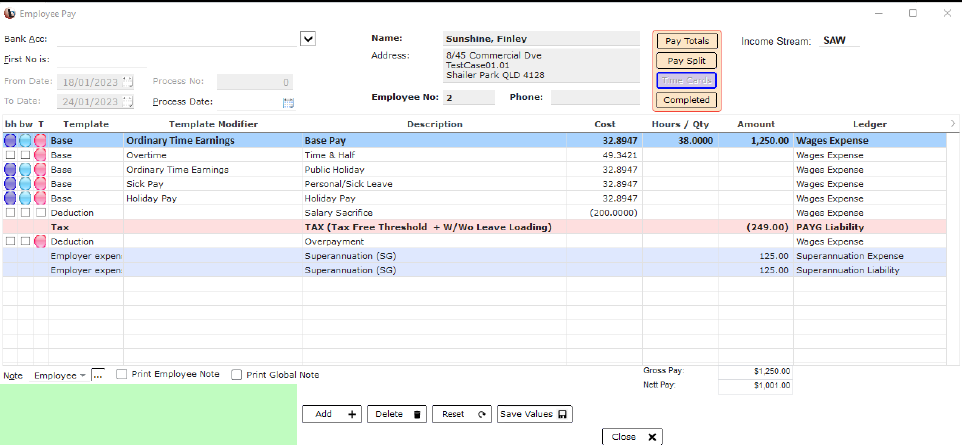
Employee Pay
The hours for the base rate will appear automatically if you have set up the pay profiles or will be imported from the time cards if used. If necessary
enter the hours worked for each of the relevant base rates.
Make the necessary adjustments to the rates; once the necessary changes have been made click next.
Repeat the same process for each employee in the pay run.

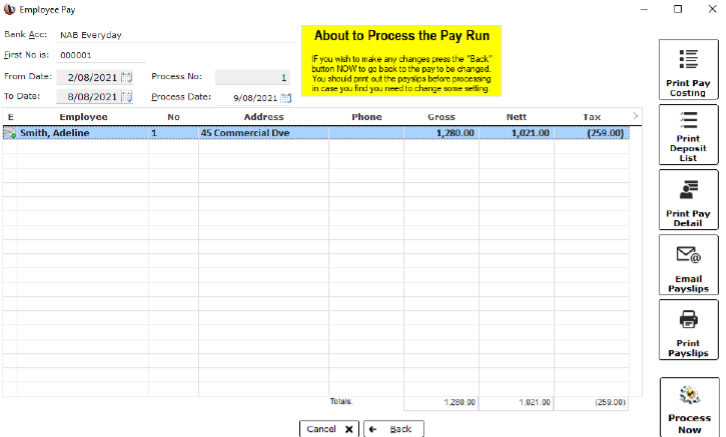
About to process
At this final screen you will see the list of employees who have been paid in his pay run.
Print reports, email or print pay slips.
If anything needs adjusting you can click the back button and make the adjustments.
As soon as you are happy with the pay process click on “Process Now”
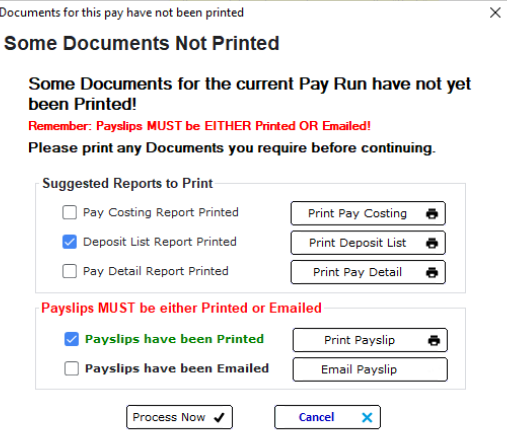
Process Now
You will be prompted with a last screen to print any additional reports. If you have all of the relevant information click “Process Now”
STP
ATO reporting no requires ALL businesses who have employees to report through Single Touch Payroll. This process reports all year to date figures for each employee in the pay run.
If you wish to lodge STP click on “Lodge Payroll
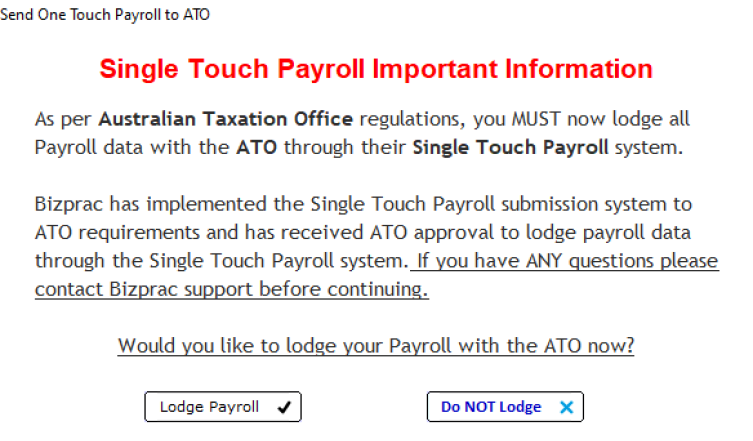
Select Pay Run
From the drop down list select the pay run that has just been completed.
Enter the name of the person running the pay run; then click OK.

Sending
The progress bar will show the transmission of the file; once complete you will be notified.
Your pay process is now complete.
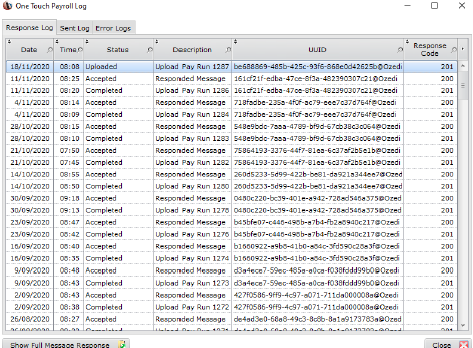
A record of the lodged pay runs is available under the reports menu.


Salary Sacrifice
Salary sacrifice or salary packaging is an arrangement between an employee and employer to pay for certain items pre-tax. Alternately pre-tax dollars are paid into the employees nominated super fund; this is the most common form of salary sacrifice. Salary sacrifice reduces the employee’s gross taxable income; which in turn reduces the tax paid.
A salary sacrifice arrangement needs to be carefully considered to ensure that all of the ATO obligations are met. Some arrangements may occur an FBT obligation; if you are unsure contact your accountant or the ATO.
As an example this guide will assist in setting up the salary sacrifice for additional super. Pease feel free to contact the office for assistance in setting up other forms of salary packaging.
Setting the Deduction
Add the name of the deduction; select salary sacrifice from the drop-down list.
Select the ledger account to use, you may like to setup a separate salary sacrifice ledger or alternately use the Super Liability ledger.
Set how the deduction will be taken; most common is a set amount per pay period.
Set the deduction type as salary packaging.
Check the boxes as shown; once complete click save to finalise the template.
Add to the Employee
Highlight the deduction and the employee.
Use the add to selected button to link the employee with the deduction template.
Edit Pay Profile
Add the template to the employee, ensure the salary sacrifice sits above the PAYG (tax) line.
Reporting Super
When preparing super reports for payment ensure to include the guarantee as well as the reportable super.
If using the Superstream report the reportable super will be listed in the appropriate column for upload to the super fund.
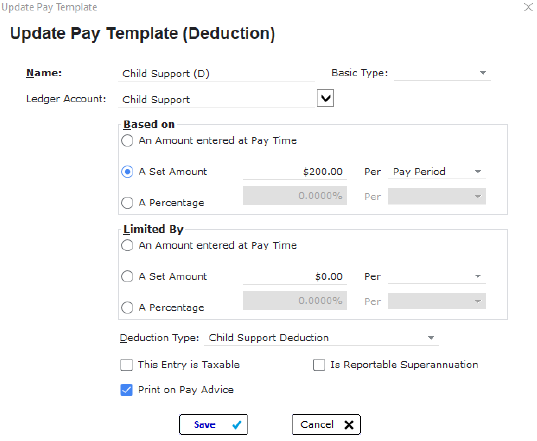
Child Support
Things to Remember
Child support is deducted only of directed to do so by the child support agency.
Some things to consider:
➢ The amount being deducted will need to be shown on the pay slip
➢ A ‘Protected Earnings Amount’ applies; ensure that the Nett pay meets the requirements
➢ The deduction amount needs to sit below the PAYG line & is taken as an after-tax amount
➢ You will need to set up a child support liability ledger
➢ Recurring payments for the amount can be setup
➢ Child support will either be in the form of a deduction or garnishee
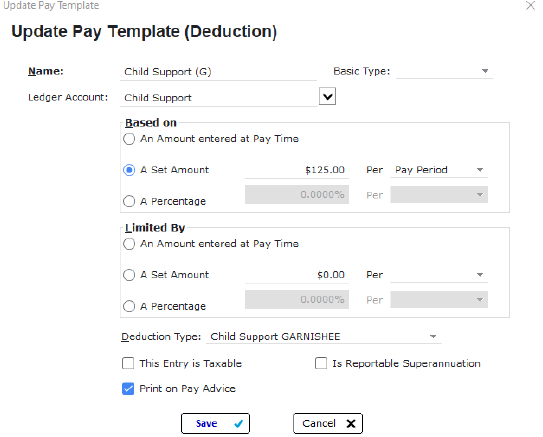
Garnishee Deduction
Set the deduction up in the deduction rate template.
Add the name of the deduction, select the ledger account.
Set the amount of the deduction.
Select the correct deduction type from the drop-down list.
Print on pay advice.
Deduction
Add the details of the deduction, including the ledger account.
Set the details of the deduction.
Select to print on pay advice.
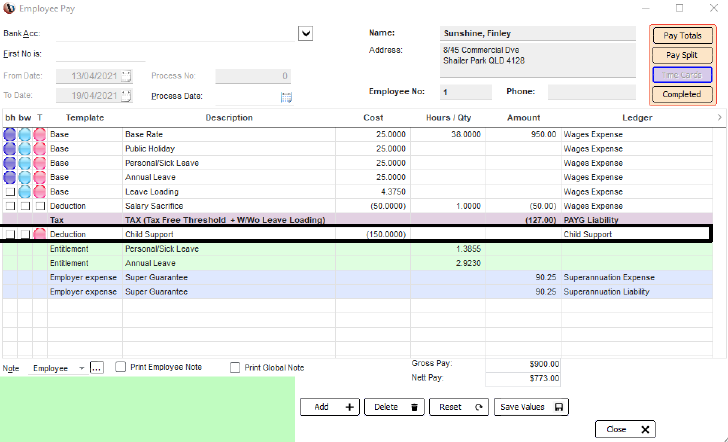
Edit Pay Profile
Add the deduction to the employee pay profile, ensuring that it sits below the payg line.
Click save to finalise the pay profile.
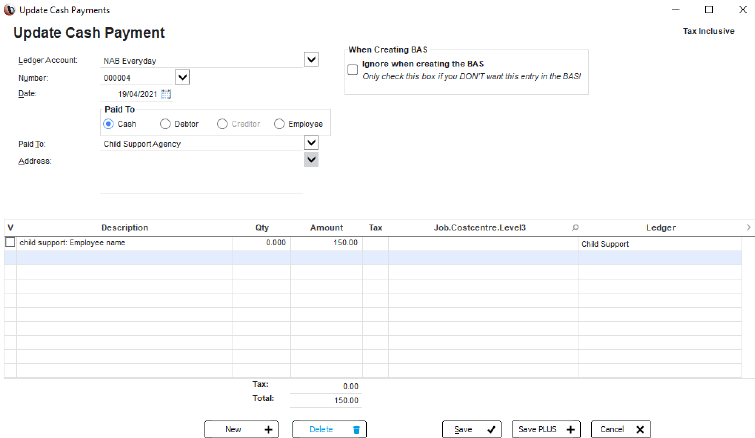
Paying Child Support
Enter a cash payment for the payment of child support. Ensure that the ledger used is the liability that has been setup.
A recurring transaction can be setup for this payment.
To see how to setup a recurring transaction refer to the current guide.
Employee Reimbursements
What is Reimbursements?
A reimbursement is paid when an employee purchases an item/goods on behalf of the company from their own funds.
The receipt of the purchase is provided to the appropriate person and authorised. Payment can then be made back to the employee. Receipts can be provided in paper form or submitted through the timecard app.
1. In the form of cash; from petty cash funds or a bank transfer. A corresponding cash receipt is entered
2. Through a reimbursement in payroll along with the employee’s wages; the payment amount will be included in their payment
Where necessary the purchases can be costed back to the job and cost centre. This guide will take you through each option; if a reimbursement needs to be done before a pay run the cash payment method will be the preferred method.
Payroll
Create a reimbursement template; this will be used to record the reimbursement to the employee.
Since this is unrelated to the employees' wages; select the corresponding expense account.
Generally, the selection will be an amount entered at time of pay.
Print on pay slip so that the employee knows the reimbursement has been paid.
Ensure you tick the Reimbursement box.

Edit Pay Profile
Add the reimbursement template to the employee profile.
Ensure the reimbursement sits below the PAYG tax line.
Pay Process
During the pay process you will add the amount being reimbursed to the employee.
The reimbursement will increase the employees Nett pay without affecting the gross.
Downloading Expenses
The mobile timecard app will allow the employee to submit expenses. You will be notified through the message board that an expense is available.
Clicking on the expenses will download the information.

Mobile Expenses
The information for the expenses will be downloaded for you to view on screen.
You can create a cash payment for the expense or delete the expense if required.
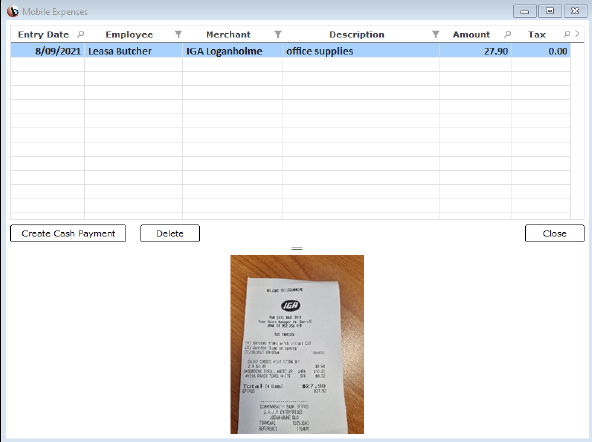
Create Cash Payment
The cash payment window will open allowing you to make any necessary adjustments to the transaction.
Assign the amount to a job and cost centre if applicable.
Ensure the correct ledger account is selected.
Click save to finalise the transaction.

Superannuation Reporting
Superannuation
Superannuation is setup in 4Pay under the Employer Expense Rate.
Once template can be attached to multiple employees, so it is not necessary to have a template for each of the Superfunds that you deal with.
If the percentage changes; simply update the change in the percentage field. This will adjust all the pay profiles attached to the template.

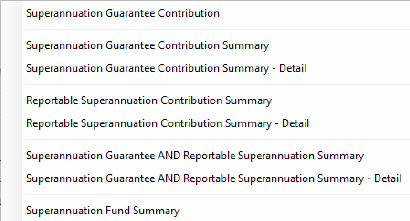
Superannuation Reporting
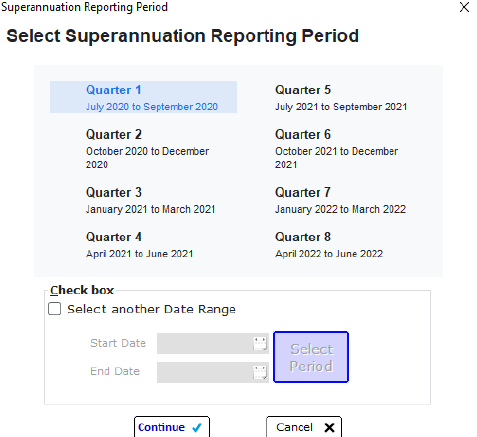
There are numerous reports available to assist with the reporting process.
The reports can be date ranged if you wish to pay Super on a monthly basis or if paying quarterly use the pre-set quarterly date ranges
Superstream Reporting
If you have chosen to use a clearing house to process your Superannuation Guarantee, 4Pay will create the .CSV file required for lodgement. There area number of things you will need to have setup to produce this file.
➢ Contact details for the Super Fund
➢ Super Fund account details or BPAY information
➢ Super Funds ABN
➢ A USI or Unique Identifier Number
➢ For Self-Managed Funds: ABN and ESA number
➢ Employee Member number details
Your employee will provide the details of their individual member number; for all of the other information this can be obtained from the Super Fund.
Admin Details
Under the settings menu ensure that the admin details are filled in.
These details will be used if you need to be contacted for any reason.

Employee Details
Each employee will need to have their Super Fund details; these will be added in the Pay Details tab of the employee record.
Select the Super Fund from the drop-down list.
The employee should provide you with their member number.
If their Super Fund allows salary insurance add that detail. Note: some Super Funds may not offer that option.
Add the effective start date; this will generally be the day the employee started working for you.

Super Stream Report
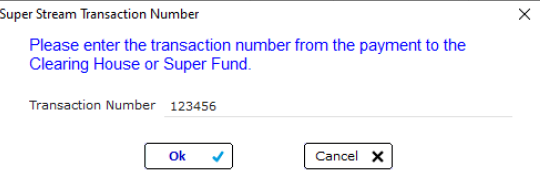
When selecting the option to report through Super Stream; select the relevant date range you are reporting for.
Enter the transaction number; this will be provided to you by the clearing house.

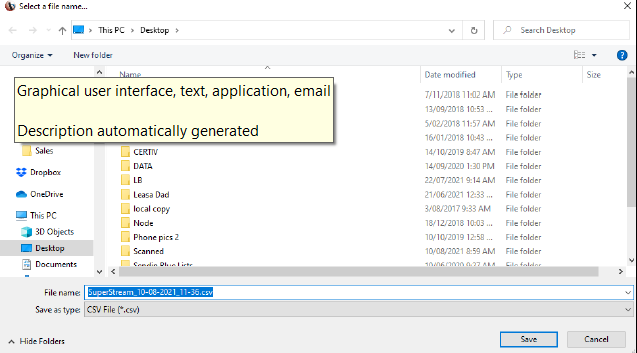
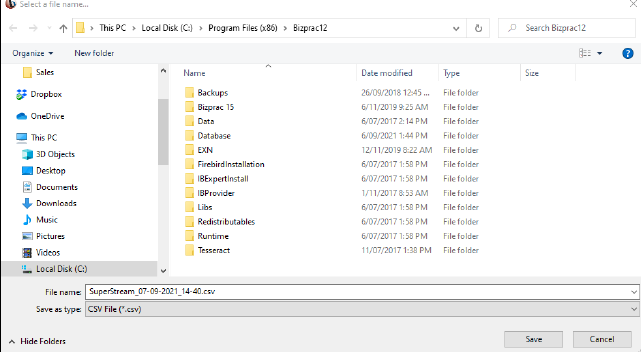
Saving the Report
The Super Stream report will be created as a .CSV file; choose the location you wish to save the file to. Once created you will be able to upload the report to the clearing house.
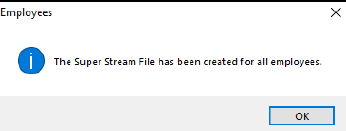
If there are any details missing for the creation of the report, you will be notified, and those details will need to be added before creating the report again.
Super Payments
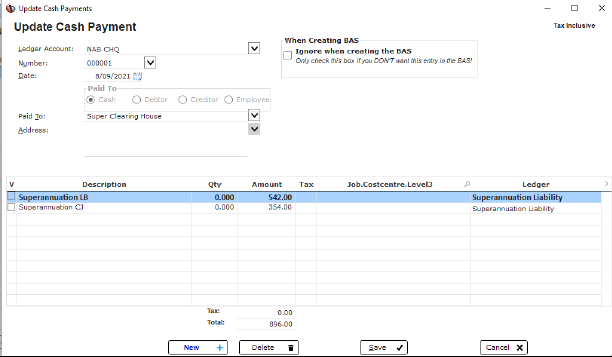
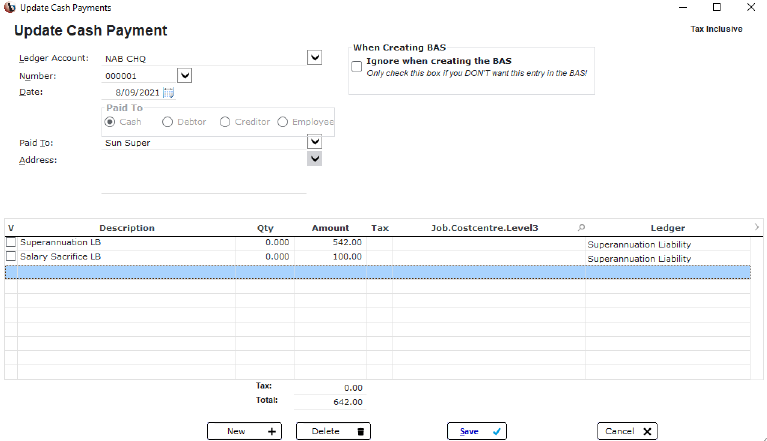
Payments for the Super Guarantee will need to be entered into the cash payments window.
A bulk payment can be made to the Super Stream entity; a single payment can then be entered with multiple lines showing the amount paid for each employee.
Since GST is not applicable no super leave the tax field blank. The ledger account needs to be the Super Liability ledger. When prompted select use this account and click save to finalise the transaction.
Super Fun Payment
If paying direct to individual super funds a cash payment can be entered for each fund.
The payment can show the individual payment or multiple lines to show any salary sacrifice amounts.
The ledger account selected will be the Super Liability; when prompted select use this account.
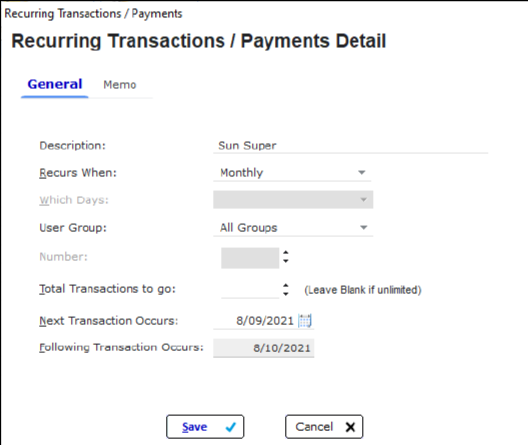
Recurring Payments
Setting up a recurring transaction enables the transaction to be created without re-entering all of the data.
Highlight the transaction and from under the utilities menu select “create recurring payment”
Enter the details of the frequency for the payment; adjust the next date if necessary and click save.
Set recurring transactions as required for each of the super payments.
Working Holiday Makers
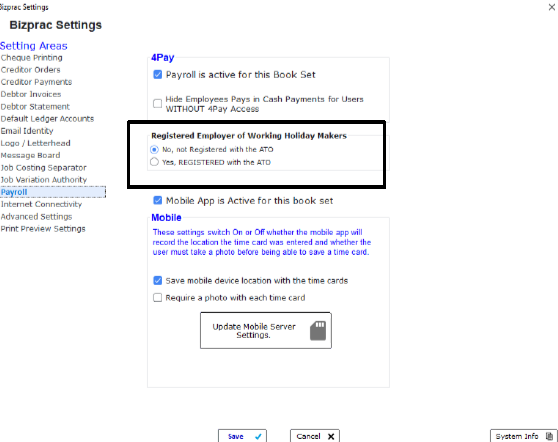
If you are employing Working Holiday Makers, you will need to have the relevant setting applied in the program settings menu.
Check the box applicable to your business.
Once this setting has been applied you will need to setup the employee.
The setting you choose will affect the tax scale of the employee.
Employee Setup
Begin entering the employee details on each tab.
Ensure each tab is correctly filled in, there are several crucial areas.

Pay Details
On the pay details tab, select the Income Stream as WHM, once selected the drop-down box will appear for selection of the country code.
From the drop-down box select the correct country.
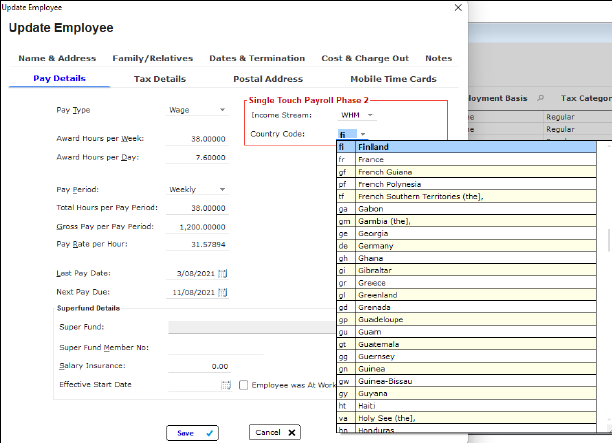
Tax Details
Enter the tax file number as shown on the employees TFN declaration.
Under tax scale category select Working Holiday Makers from the drop-down list.
WHM Not Registered
If you are NOT a registered WHM employer, the required tax scale will be Foreign Resident.
Ensure all the correct templates are applied as per the employment agreement.

WHM Registered
If you are a REGISTERED WHM employer, the required tax scale will be Working holiday makers income tax rates.
Ensure all the relevant templates are added for Super, leave accruals as per the employee agreement.

Paid Family Leave
The Fair Work Act has introduced an entitlement of 10 days paid leave for employees experiencing domestic violence.
• Leave entitlement is 10 days paid leave within a 12-month period.
• Eligibility to take this leave, is extended to domestic violence by a member of an employee’s household, or current or former intimate partner.
• Pay slips should not identify this as family or domestic violence leave. Instead use an appropriate name; for example, purposes in this guide “Special Leave” has been used.
• Leave is not on a prorate basis, cannot be set to accrue and any unused leave does not accrue to the next year.
This change commences 1st February 2023 for companies who have more than 15 employees or 1st August 2023 for companies with less than 15 employees.
*The information contained in this guide is for informational purposes only and is not intended as a substitute for professional advice.
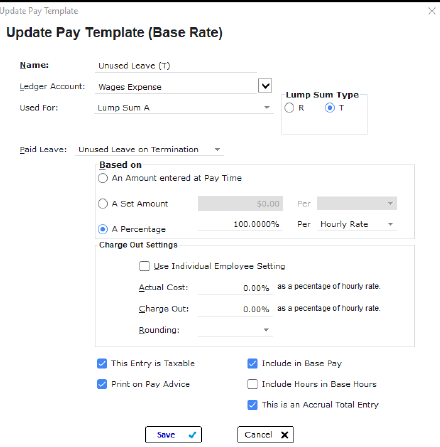
Base Rate Setup
Setup the base rate to be used. Ensure include in base pay & base hours are ticked. This will assure that super & accruals for other leave entitlements will be correctly applied.
Tick that this is an accrual entry, this will allow for an opening balance to be added as well as tracked.
The name of the base rate MUST not be called FDV Leave nor refer to any leave type. Select an appropriate name to suit.
Pay Profile
Add the base rate to the employee as required.
Add Opening Balance
Click on Total pay for employee; find the base rate in the list.
Select modify opening balances, add the opening balance hours. The hours will need to add to a total of 10 days leave for the year.
Leave Balances
Complete the pay process as normal.
The leave balance can be monitored under the employee pay totals.

Termination Templates
When finalising a pay run for an employee who is leaving your employ there are several things that need to be checked.
• What leave does the employee have that will need to be paid out? Annual or long service?
• What amounts are subject to the Super Guarantee?
• Do you need to issue an ETP?
• Is the payment a Redundancy?
• What payments are taxable? The tax rate can vary depending on the type of payout.
• Are they being paid an amount in lieu of notice?
*The information contained in this guide is for informational purposes only and is not intended as a substitute for professional advice.
What Do I Need?
Employment contracts and award entitlements vary from state to state so it is important to ensure you are finalizing the pay correctly. If in doubt regarding the type of payment that needs to be made you may contact Fair Work Australia, the ATO or your Accountant, they will assist with the correct information.
Termination and Redundancy payments may be taxed at a different rate to normal pay; in some cases, tax may not apply. These payments will require a manual calculation, consult the ATO website to verify what tax is applicable.
General
When completing a termination, you may need to add multiple pay templates.
They may include:
• Redundancy
• Unused Annual/Long Service Leave
• Time in lieu of notice
• Golden Handshake
• ETP
Some termination payouts are taxed at a different rate while other may not be taxed at all.
When setting up the template consider if the entry should be:
• Taxed
• Printed on the payslip
• Subject to the Superannuation guarantee (include in Base Hours)
Lump Sum Options
There are a variety of Lump Sum options; listed below is a general guide of how they will be used. The use of these options will depend on the type of payment being made; Redundancy or Termination payment. In some cases the timing of when the leave accrued will need to considered. Consult the ATO website to determine the appropriate designation for your individual circumstances.
Lump Sum A: will generally be used for the payout of unused Annual or Long Service Leave
Lump Sum B: Used for the payout of Long Service Leave accrued prior to 1978
Lump Sum D: used for the payment of a Redundancy
Lump Sum E: used for the payment of a back payment
Lump Sum W: used for a return to work payment
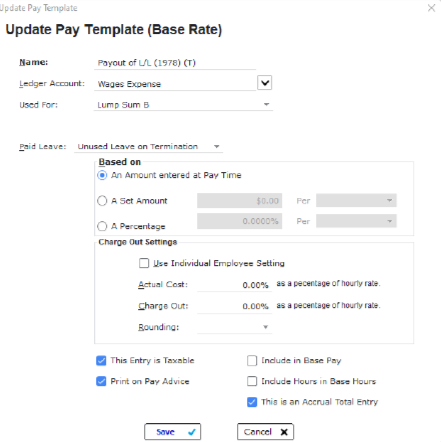
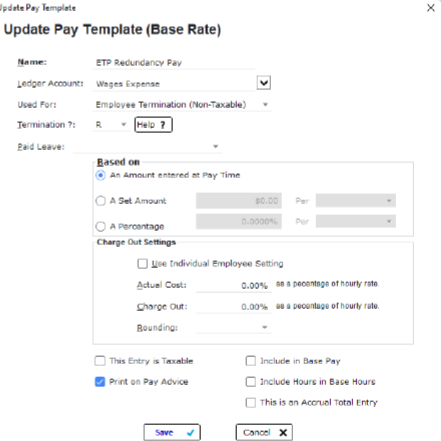
Lump Sum 'A' Setup
Add the name of the base rate and select the correct ledger.
Lump sum type selection:
R: if the amount is related to a genuine redundancy
T: for all other situations
Select the paid leave option “unused leave on termination”
Confirm the tick box selections as applicable. Ticking the this is an accrual entry will allow the transfer of hours between templates.
Lump Sum 'B' Setup
Add the name of the template, include the relevant wages ledger.
Select Lump sum B from the drop down; as well as unused leave from the Paid Leave options.
Select the relevant tick boxes, by ticking this is an accrual entry you will be able to transfer leave between templates.
Lump Sum 'D' Setup
Add the relevant name for the template including the wages ledger.
Select Lump Sum D; since these are usually used for Redundancies no paid leave option is required.
Select how to add the amount, since Redundancies are generally tax free there is no need to select the tax check box.

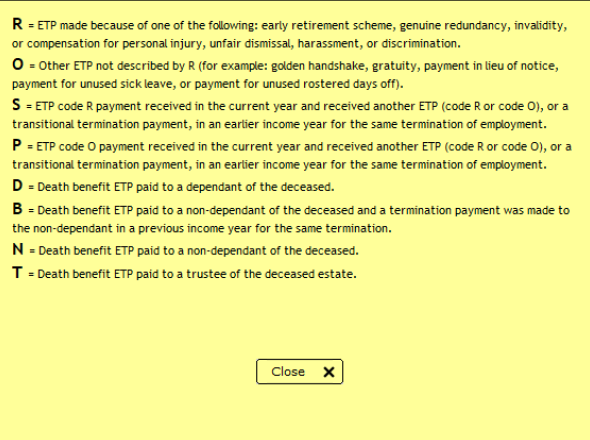
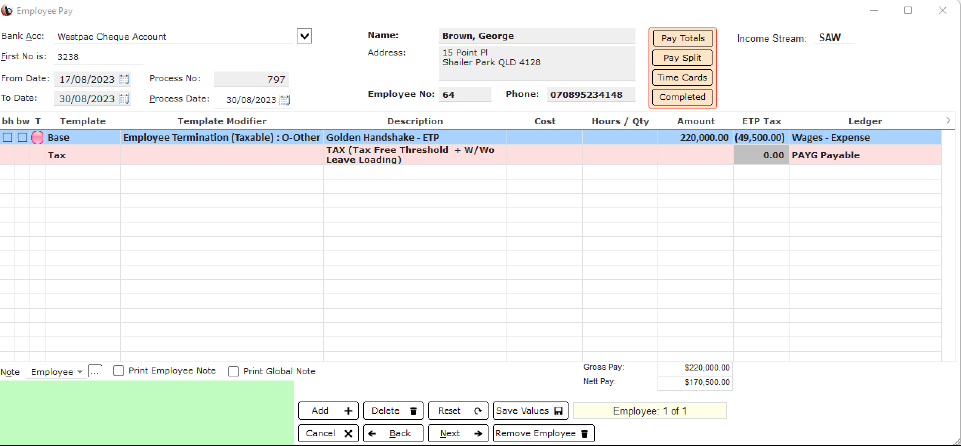
ETP Designations
An ETP will need a termination designation.
These are list of codes; when creating the template for an ETP, select the correct designation code to apply to the pay being processed.
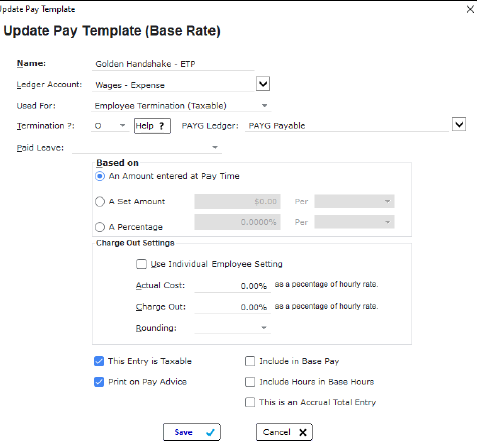
ETP Taxable Setup
Add the relevant name for the template, selecting the wages ledger account.
Select the termination type from the drop-down selection.
For a taxable ETP you will also need to select the PAYG ledger.
Depending on the type of ETP, you may also need to select an option from the Paid Leave drop-down.
The taxable option will be automatically selected, also select print on pay slip.
ETP Non Taxable Setup
Add the relevant name for the template, selecting the wages ledger account.
Select the correct designation from the drop-down box.
Select print on pay slip.
Adjusting Tax
Payments upon termination may require an adjustment to the tax deducted.
Click into the tax line and make the necessary adjustment as required.
Taxable ETP
Using the taxable ETP will require the tax to be completed as a separate calculation.
Enter the details of the ETP Payment and then add the calculated tax amount.
Add any additional details and process as normal.
This example has a single entry for the process.
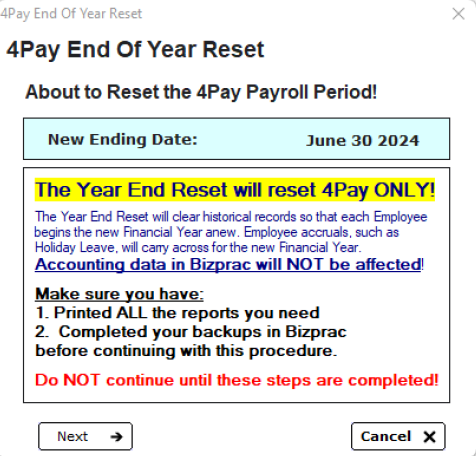
End of Year Reset
4Pay requires its own “End of Year Reset” independent of the Bizprac End of Year Reset.
If a rollover is not completed for the financial year, YTD totals on the pay slips will show the previous year’s totals as well as the New Years. These figures will reset once the rollover is complete.
It is best to complete the rollover as soon as you have finalised your pays for the financial year. Please note that a rollover cannot be completed prior to June 30 of the current financial year.
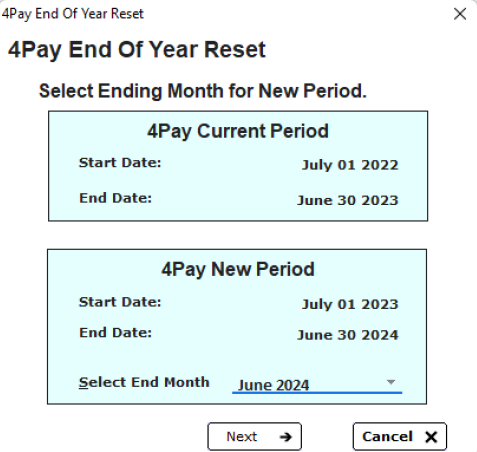
New Pay Period
You will find the end of year reset option under the settings menu in the 4Pay tab.
Once selected it will show you the current pay period and the new reporting period.
The date range should NOT be changed.
Warning !
The end of year reset will clear the historical records for the employees ready for the new financial year.
All accruals such as personal, annual, long service and RDO’s will carry over.
A historical database will be completed during the rollover process and will be accessible for you on completion, through the database list.
Click NEXT……
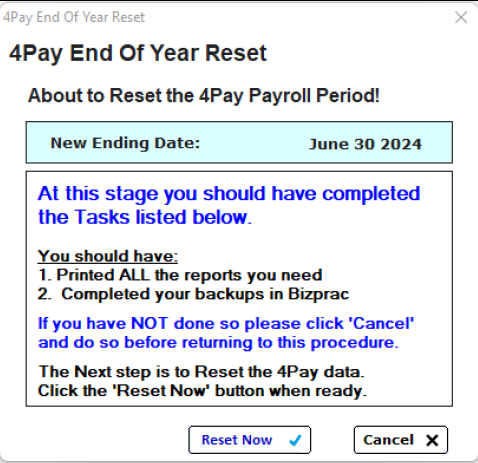
Last Chance
If you are unsure in any way, click cancel and call the support team for assistance.
Otherwise click reset now.
The database will be copied and the found in the database list if needed for historical purposes.
Once complete continue with payroll as normal.

Employee Deductions
Deductions
There could be several reasons to add a deduction to an employee's profile.
• Salary Sacrifice (see guide for Salary Sacrifice)
• Child Support (see guide)
• Additional tax
• Repayment for goods purchased on company accounts
It important to ensure that if a deduction is set up it is place correctly on the employee’s pay profile. A salary sacrifice amount affects the employee’s GROSS amount. An after-tax deduction affects the NETT amount the employee is paid.
Additional Tax
Setup the template for the deduction of additional tax.
Use the payg ledger account.
Select how the deduction will be processed.
Print on pay advice.

Pay profile
Add the template to the employee profile, ensuring it sits under the tax line.
This deduction affects the NETT amount the employee is paid.
Employee Repayments
Setup the deduction template.
Add the ledger account, it can be an expense account or a liability.
Select how the amount will be deducted and tick print on pay slip.
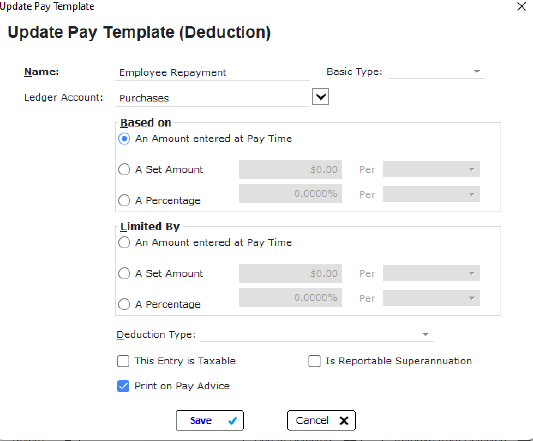
Employee Profile
When adding to the employee profile, ensure the deduction is sitting under the tax line.
The deduction will be taken from the employee’s NETT pay.


