TABLE OF CONTENTS
Introduction to Estimating
Bizprac Estimating is an integral part of the Bizprac program and data entered into Estimates is used throughout the software. The information added to the estimate is used to create jobs, purchase orders, complete claims by percentage and track job costings. It is used extensively in reporting for comparisons between estimated and actual costs in the jobs section. In the use of estimating consistency is the key; choose how you wish to estimate either Inclusive or Exclusive of GST. Once you have selected the option keep that selection throughout the rest of the program.
Unlike other estimating packages your control over ordering and job costing is completed not through the estimate but through the relevant area in Bizprac. Flexible functions allow you to create orders on the fly for a job but the bulk of ordering will be completed through the orders screen.
Bizprac’s integration continues through all aspects of the software. So to get the most efficiency from Bizprac, each section should be setup at the start to take advantage of the many time saving features that his integration makes possible. Once you are setup tweaks can be made to maximise the program.
Taking the time to setup your database and then maintaining it on a regular basis will allow you to estimate faster and with higher accuracy. Before setting up and using estimates it is important to have your base information correct and as extensive as possible.
How to Setup Bizprac
Bizprac as with any software works more efficiently when setup as recommended. The following will give a guide as to the process that needs to be followed.
➢ Creditor List: Enter your creditors, setting up the sub contractors as you go. This will help to form your supplier list.
➢ Price Lists: create a main/supplier list. Save time by using the import wizard; any additional prices can be added manually.
➢ Estimate Masters: Setup the base templates you wish to use. Remember you only need to start with one; that one can then be copied, modified and used over again.
➢ Structures/Assemblies: Start with the main structures you plan to use, additional structures can be added as required.
➢ Clients Potential/Debtor: Potential clients are added and attached to the estimate. They can then be used to create debtors. If the debtors have already been added you can pull the information back to the potential clients.
➢ General Ledger: Bizprac comes with a standard set of ledgers. Add any additional ledgers that may be required; as well as assigning bank/loan account details.
Bizprac is Different to Generic Accounting Packages
Job costing management is completed through the Jobs area of the program; not assigned back to a ledger account. The comparison of estimate to actual costs is done either through the job cost window or through one of the reporting options. So there is no need for costing ledgers to be used to track jobs. We recommend keeping your General Ledger list simple to cover the main expenses.
The list of cost centres you use will determine how extensive your costing is. It is best to strike a balance between too few and too many cost centres. Too few and you may not get the detail you require; too many and the report can become to large to check easily. The list can easily be added/changed as required to suit each individual project.
Cost plus jobs are easily managed as costs are recorded against the job as invoices are entered; allowing ease of invoicing or the completed works. Cost plus jobs do require a base estimate containing cost centres. Basic information and approximate budgets can be added to the estimate if required.
Definitions
Since wording can vary from package to package the following are a list of definitions that are used in Bizprac.
➢ Estimate: An estimate (quote or tender) is a list of costed materials and or services which we anticipate will be used in a particular project. The final cost of the estimate will usually include a profit margin or mark up to determine a contract price.
➢ Job: If the quote or tender is accepted; the estimate will be turned into a job. A job contains the estimate budget for tracking as the costs are recorded. Invoicing will be managed in this area also
➢ Cost Centres: are a title or heading used to group, organise and manage products and services which are used within the estimate. Cost centres can be adjusted, added or deleted as required. You may use as many or as little cost centres as you need. Main cost centres cannot be used as a duplicate entry
➢ Sub-cost centre*: this is a cost centre used within a cost centre. The cost centre will act like a main heading with the sub cost centres being used to group products or services together. While a main cost centre can not be used more than once within an estimate. Duplicate sub cost centres can be used provided they are used within different main cost centres.
➢ Supplier: describes people, businesses or companies for whom we have a price list of their products or services.
*Ultimate version only
➢ Creditor: describes people businesses or companies from whom we purchase products or services and with whom we may have some type of credit account.
➢ Sub-contractor: may be an individual, partnership, company or trust. They will be contracted to perform a service.
➢ Products: are a list of materials and or services stored within the Bizprac price list. Price lists can be imported using the import wizard.
➢ Items: are one off entries in a cost centre. Items are used for goods or services that would be considered specialty items; they do not usually make up part of your pricelist. They do not form part of the pricelist and cannot be used in structures. They can be linked to a supplier to enable order creation. Once linked to a supplier they can be added to the pricelist at a later time if you wish.
➢ Headers: Group products or items within a cost centre under a heading
➢ Structures: are collections of products that make an assembly /recipe. Structures are useful to speed the estimating process and are commonly used for items like block work, retaining walls, slabs and footings.
➢ 3rd Level Job Costing: function within Bizprac Premium & Ultimate versions that allows you to cost and report on individual products within the cost centres.
Estimating Functions and Features
Features
Available features, some features may vary between the packages.
➢ View the list of estimates
➢ Add new or modify estimates
➢ Perform a variety of functions under the utilities button
➢ Run reports
➢ Jobs can be created from an estimate in the list
➢ Add a diary note*
➢ Attach & view documents*
➢ Add notes/ reminders
➢ Adjust the view options
➢ Lock a completed estimate
➢ Easily view client and update details
➢ Use the Trade breakup to view the estimate details
*These functions are only available in Premium & Ultimate versions

Notes
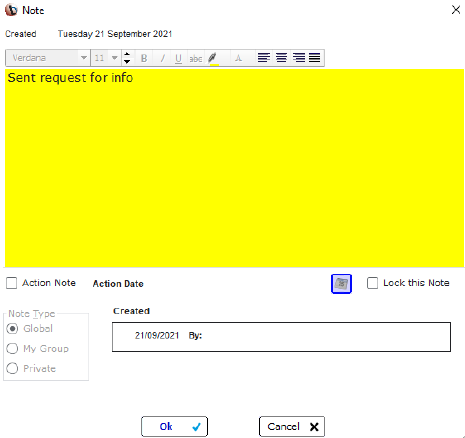
Notes can be added to any estimate by clicking in the note column.
Add the details of the note.
Notes can be actioned; they will then appear in the message board for the indicated date.
Notes can be restricted to a user group or locked if security is set within the program.
Locking the note will prevent others from making changes.
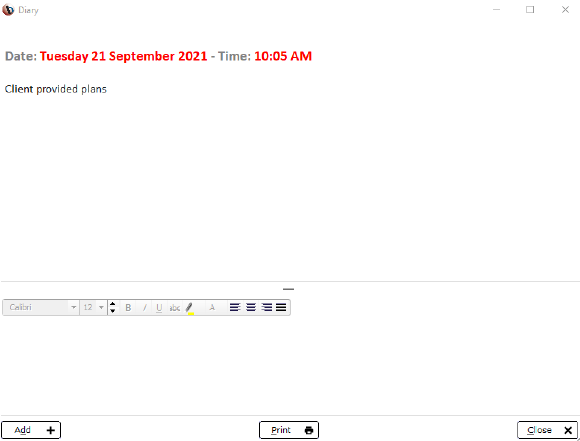
Diary
Clicking on the diary function column will open the diary for that estimate.
Entries can be added as required and will be date and time stamped.
This can be useful for a diarised timeline of the project.
It should be noted that entries can be printed but cannot be adjusted or deleted.
Attaching Document
The Premium & Ultimate versions of Bizprac will allow you to attach documents.
Clicking on the attachments column will open the attachments window.
Add a description of the document and then browse to the documents location to attach. Continue with this method until you have added the required documents.
Documents can be deleted or opened from this window.


View & Lock Options
The view option will adjust the cost summary tab according to the selection made. Costs & Prices can be shown either as Ex-GST or Inc GST.
Clients can be listed to display by client type.
If categories are added to estimates you can filter the view if required.
By locking an estimate you will prevent any changes being made to that estimate.
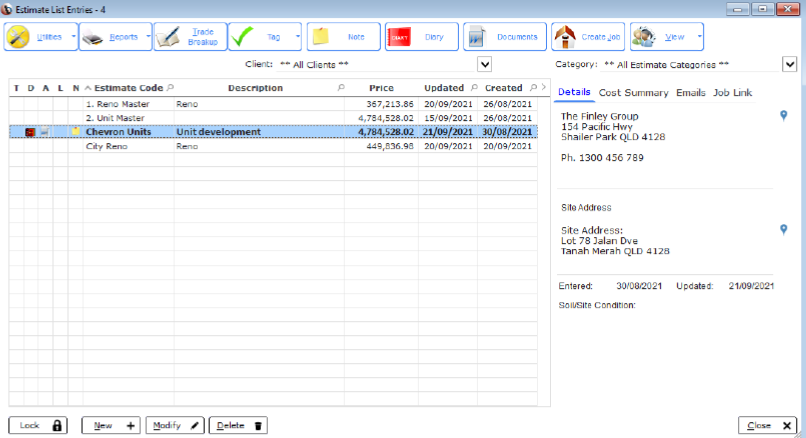
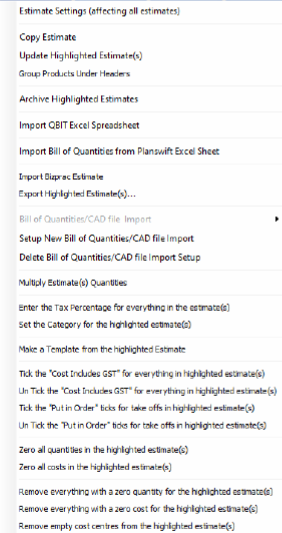
Utilities Menu
The utilities menu provides a variety of functions.
Allows to set a number of rules for all estimates setup.
Copy or update estimates as required.
Import varying csv spreadsheets.
Use a variety of options to update/ clear estimates.
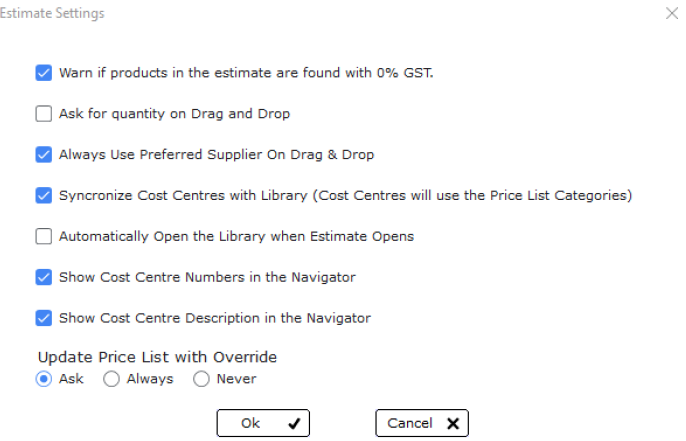
Estimates Setting
Adjusting these settings will be an automatic process for each estimate created.
It should be noted that each estimate can be individually set for the mark up option. This can be accessed by clicking on the trade breakup and opening the settings button.
Trade Breakup Functions & Features
Trade Breakup
By clicking on the Trade Breakup, you will access the information contained in the estimate.
➢ Adjust the settings for the estimate (specific to this estimate)
➢ Make adjustments to how you view the estimate
➢ Check for missed items*
➢ Complete a take-off for the estimate using ExtraXION**
➢ Add or adjust Cost centres
➢ Add sub cost centres***
➢ Using the library add products
➢ Add items to the cost centres
*Feature of Premium & Ultimate
**Extraxion is an add on product
***Feature of Ultimate version only
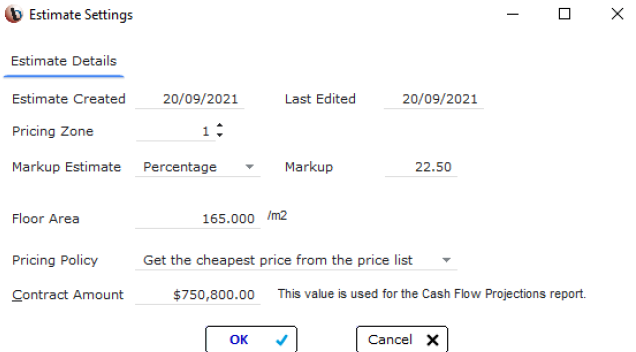
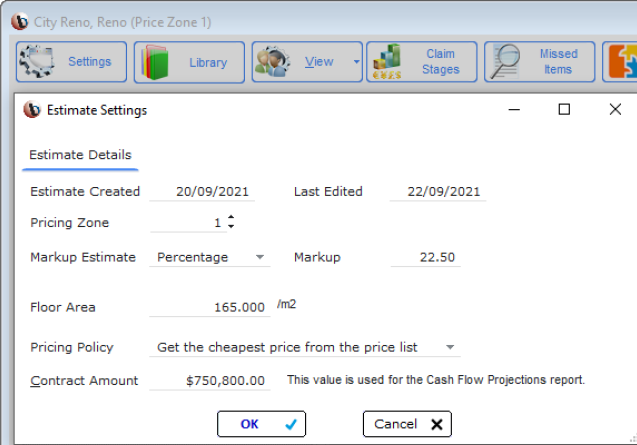
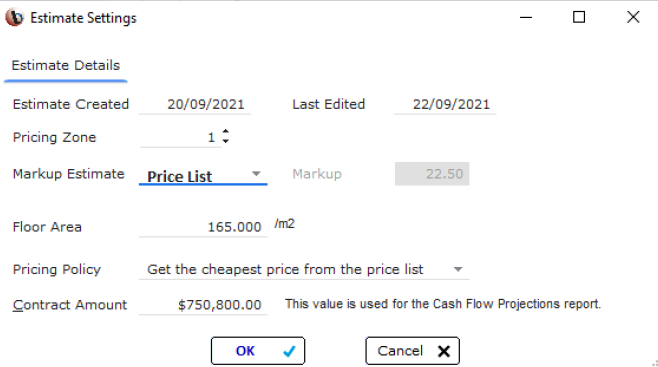
Settings for the Estimate
This setting option found in the Trade Breakup screen; and only applies to the estimate you are working on; the settings can then be varied for each estimate.
The dates will automatically be recorded.
If pricing zones have been used in the pricelist, specify the price zone to be used for this estimate.
Select the mark up for the estimate; refer to the mark up guide for a full list of options.
Floor area can be added if required and will show as a break down in the cost centres.
Adjust the pricing policy for the use of the price list.
By adding the contract value you will be able to use the cashflow report.
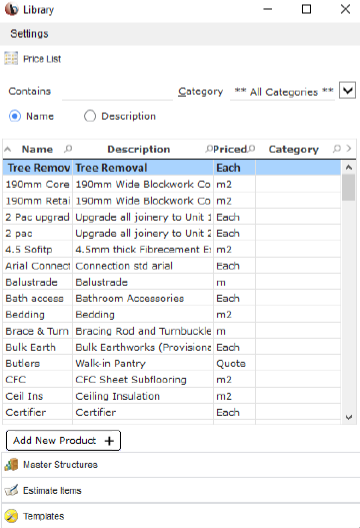
Library
The library will allow access to the price list, master structures, other estimates you have created as well as templates.
You may drag/drop products from the pricelist individually or in groups.
Master structures can be used in a cost centre or as global structures.
Accessing previous estimates will allow you to pull cost centres and or products direct into the cost centre you are working on.
Templates will allow you to create a new list of cost centres to begin a completely new estimate.
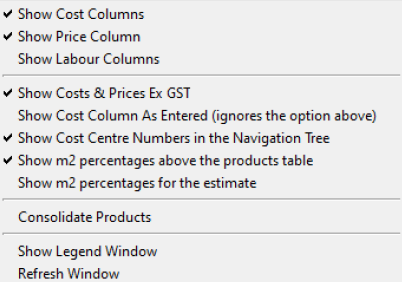
View
Provides a number of options on how you view the estimate you are working on.
Adjust the columns that can be seen.
Costs and prices can be viewed as Ex GST, showing the cost centre numbers will display in the cost centre list.
A variety of percentages can be displayed as well.
Consolidate products will provide a complete figure for products used multiple times within a cost centre (most effective when using Global Structures)
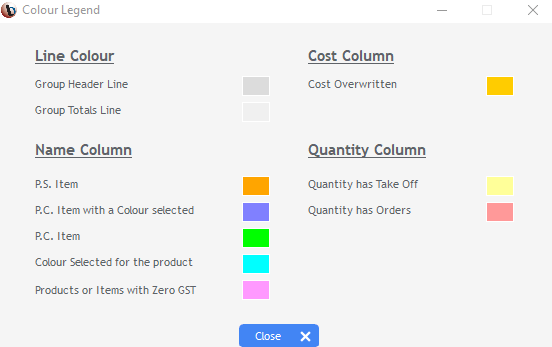
Ledgend & Refresh Window
Bizprac uses colours to denote changes that may have been made.
The colour legend will allow you to see what changes have been made or what the colour relates to.
The refresh window will refresh the window you have been currently working on. This is useful if you have made numerous changes.
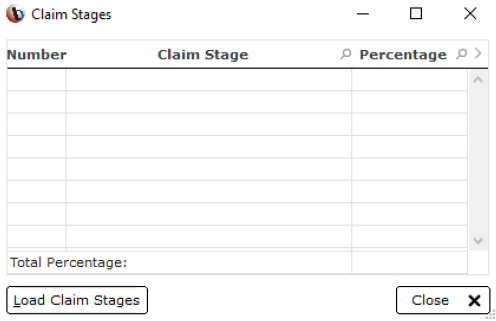
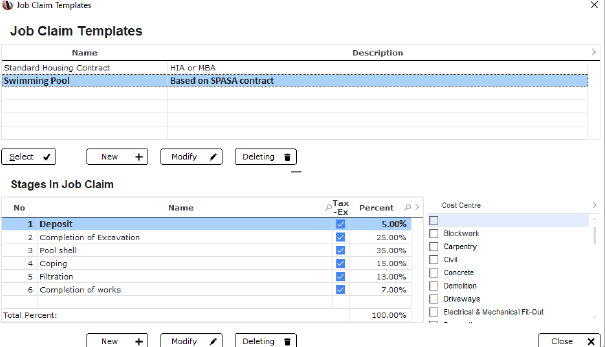
Claim Stages
Adding claim stages will allow you to create a cashflow report.
The claim stages are attached to the cost centres; for example cost centres such as Preliminaries would be attached to the deposit claim stage and so on.
This will allow you to create a cash flow report that will show the cash flow position at each stage.
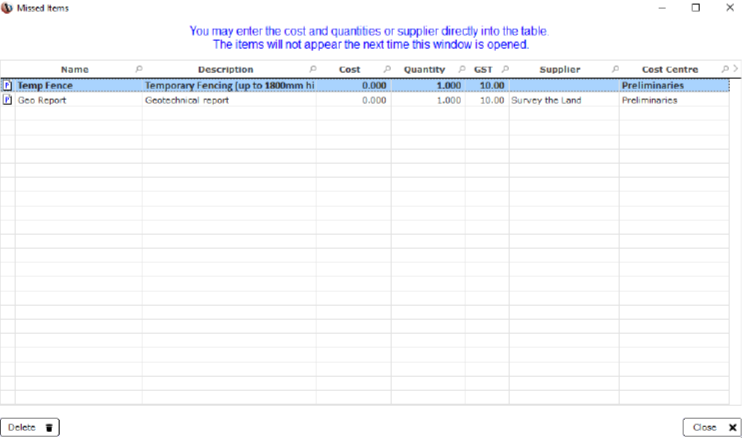
Missed Items
The missed items function allows you to see if there are any missed areas in the estimate.
From this window you can add the missing item/s.
This function checks for missing costs, quantities, GST or supplier.
Icons Explained
Product from the pricelist

Product from the pricelist with a take-off

Item, one off required, not contained in the pricelist

Item, one off required, not contained in the pricelist with a take-off

Structure, from the master structures list

Product contained within the structure

Product contained within the structure with a take-off

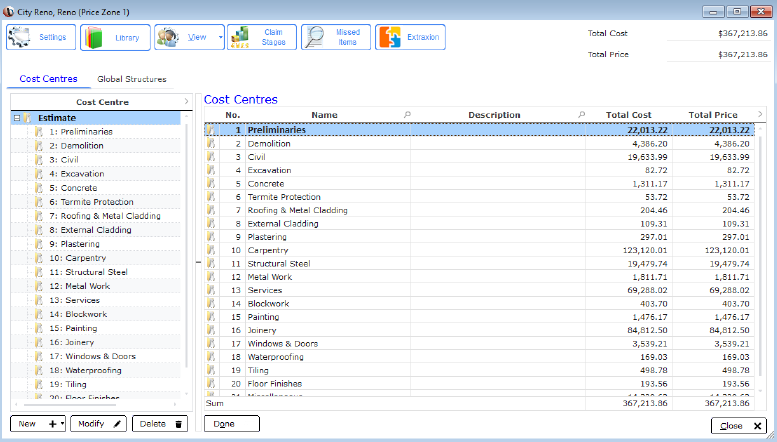
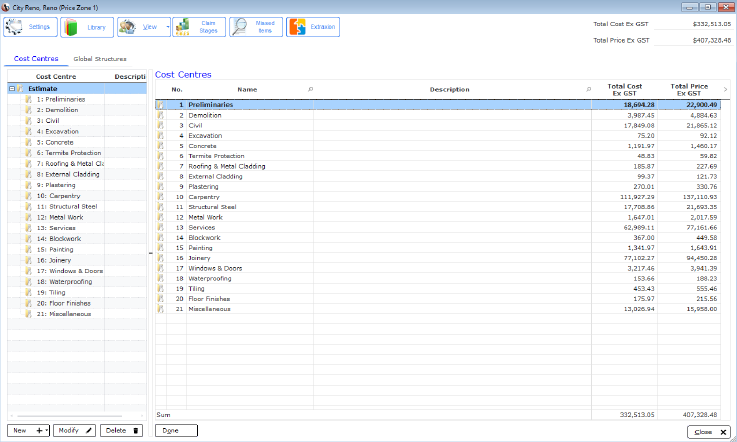
Cost Centre Tab
The Cost centre tab will provide a full list of the cost centres in the estimate.
At this screen you can also add cost centres from a previous estimate using the drag drop method. Using this option will allow you to copy all of the items or products as well.
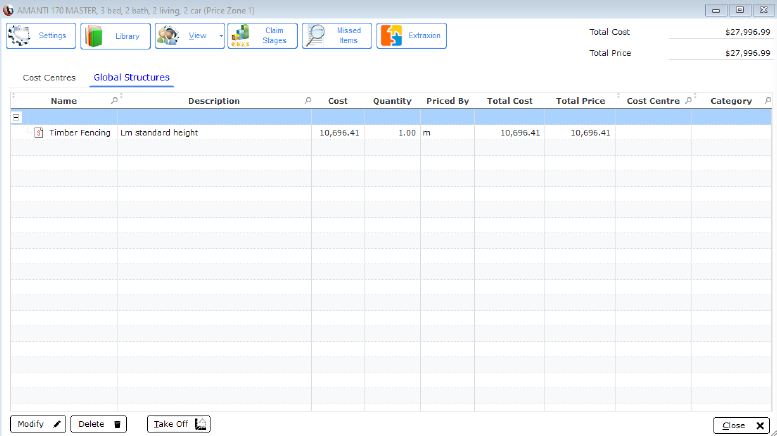
Global Structures Tab
Global structures that have been added to the estimate can be viewed on this tab.
Using the drag drop function from the library additional structures can be added as required.
ExtraXion
ExtraXION can be added to any Bizprac package. This program will allow you to import plans and complete a take off.
The figures completed during the take-off will be automatically added to the estimate you are working on.

Marking up an Estimate
Marking Up the Estimate
The estimate setting found in the trade break up has several options for marking up your estimate. The mark-up on an estimate is the amount added to the cost of the project. Once all costs of the project are taken into consideration, the amount left over is the profit of the job. Using the mark-up option will help you to assess the potential profit you can expect.
Each of the options will calculate a profit for your estimate; however it is important to understand how each of these options will calculate. Of course the accuracy of the profit at the end of the job will always start with knowing what your base cost is. The more accurate your estimate, the better opportunity of realising the projected profit.

Mark-Up or Margin
Percentage mark-up or margin??? It is important to understand how each of these methods calculate so that the correct percentage can be added to achieve the desired result.
Mark-up: is an amount or percentage that is added to an estimate base cost to then obtain the contract value.
For example our estimate cost is $95,000 and we wish to add 25% mark-up; so calculating 25% of $95,000 equates to $23,750. Adding this amount to the base cost the contract price becomes $118,750
Now using the same base cost look at the margin……………….
Margin: is the cost of the sale (or contract value) minus the estimate cost, then calculated as a percentage to obtain the expected profit on the project.
If the contract value is $150,000 and the cost to complete the project is $95,000 the estimated profit on the job will be $55,000. As a percentage it would be 36% margin of the contract value.
Each job should be assessed to determine which method would be best to use.
Settings
Open the trade breakup screen for the estimate. Under the settings option in the menu; the estimate setting selection will display.
Under the mark-up estimate use the drop down box to show the list of available options:
➢ Cost centre
➢ Percentage
➢ Profit margin
➢ Pricelist
➢ None
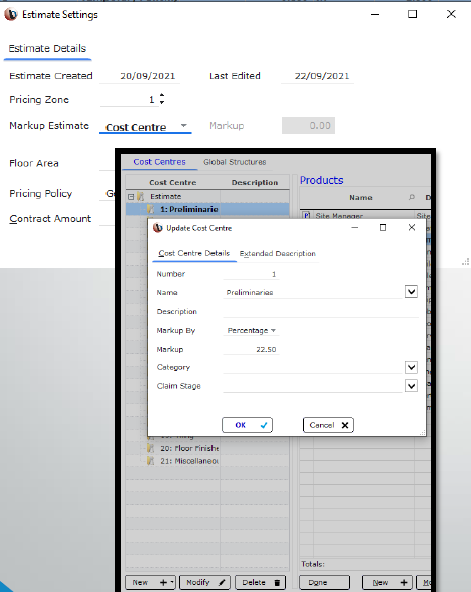
Cost Centre
Selecting cost centre will grey out the mark-up option in the settings window.
The mark-up must then be set within each individual cost centres. You can select from percentage, profit margin, price list or none.
Different percentages can be set for each cost centre if using either percentage or profit margin.
If the pricelist option is selected, the mark-up set for each product will be used. Remember the mark-up must have been set in the pricelist.
No mark-up will be applied if none is selected.
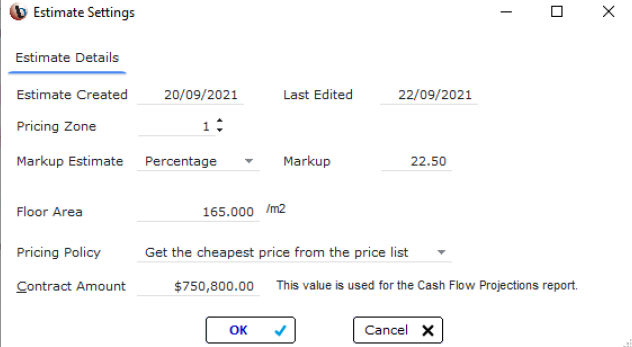
Percentage
The percentage option will calculate the percentage of the base cost and then add that amount providing a final price for the project.
At anytime during the estimating process you can change the percentage up or down. This will allow you to see the affect that it has on the estimated profit.
Running the costs and prices report will show you the estimated profit for the job you are quoting.
Profit Margin
When using the profit margin option you will increase the percentage to reach the desired contract value.
If using this method the individual products will display a much higher mark up rate to reflect the calculation.
Price List
Using the price list option will grey out the mark-up option.
The mark-up will then be taken from the individual products or items used. Mark-ups can be added when creating the pricelist.
If you are using items in the estimate, a mark-up percentage can be added to each item entered
None
Selecting the NONE option will simply show the cost and price the same.
No mark-up of any kind will be used.

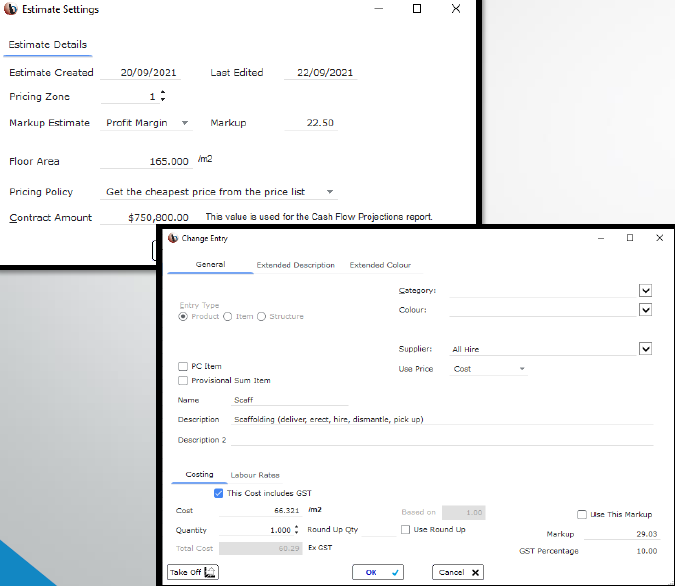
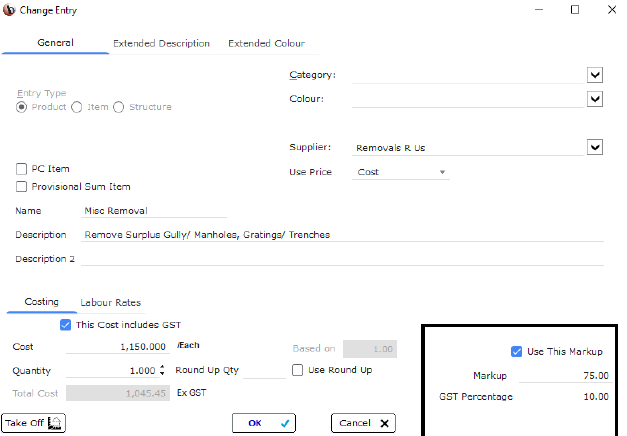
Options
If you have used the percentage or profit margin options to mark-up your estimate; you have an option to mark-up individual products or items.
Highlight the product or item and click modify. In the bottom left hand corner add the required mark-up and tick “use this mark-up”
This mark-up will then be used to calculate the additional cost of this product.
Potential Clients
Introduction
The clients area will allow you to add potential or client contact details for the quoting/ estimating process. Since they will not have signed a contract at this time they will not be in the debtor list. If they do not accept the quote they may never go into the debtor list.
Repeat clients do not need to be entered multiple times, the same record can be reused.
Diary, general or action notes can be added to record information.
Clients are attached to the estimate that is being worked on and can be turned into a debtor upon the job creation process.
Clients
Potential clients can be added at this screen.
You can sort by client type if desired.
Diary notes can be added to the client as well as notes.
To begin adding a new client click on the new button.

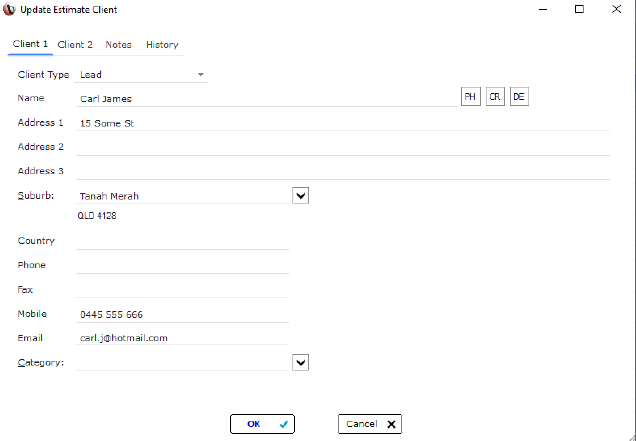
New Detail
Add the details for each of the lines.
The address will be the address of the client where the invoices will be sent to.
Once all of the details have been added click OK to save the record.
Details of a 2nd client an also be added along with notes.
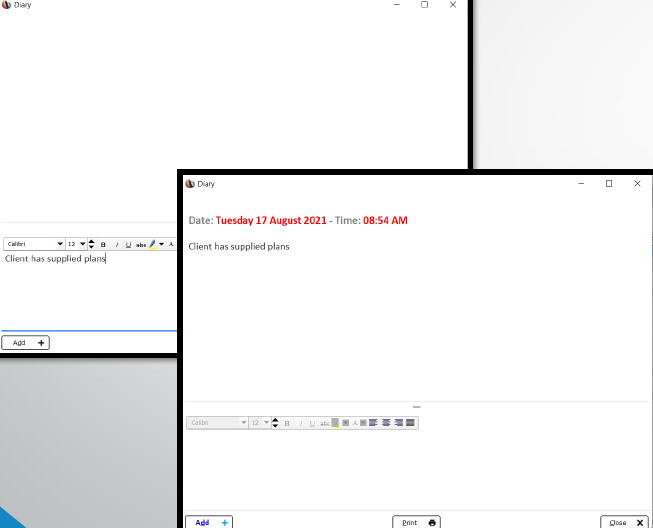
Dairy Function
Clicking into the diary column will bring up the diary function.
You can add details as required, click add and the entry will be added to the time line.
All entries are date and time stamped and cannot be altered.
Sub Cost Centres
Introduction
When setting up the estimate for quoting cost centres will be set up for the order of the build or as you wish to see the list.
Main cost centres group information together; for example Preliminaries; may contain of all of the products/items for the start of the project. The introduction of sub cost centres in Bizprac Ultimate will allow for further break down of costings into sub headings (sub cost centres) as well as additional flexibility for claim by percentage in the jobs area.
Businesses who deal with multi-story or multi-dwelling structures will benefit from these as the estimate can be broken down into levels/units. This will allow for costings such as preliminaries to be recorded in each of the cost centres and then claimable by percentage for each level or unit.
The introduction of sub cost centres will provide greater flexibility for job tracking as well as claiming.
Setting Up Sub Cost Centre
Set up your estimate details and click on Trade Breakup.
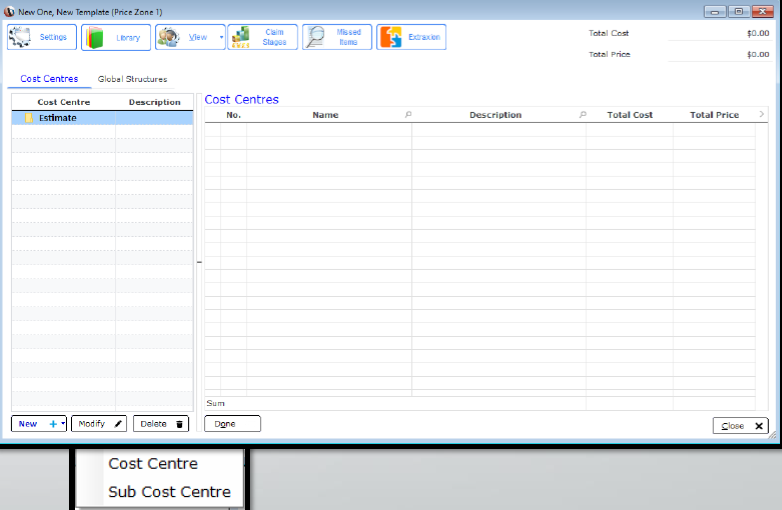
To add a new cost centre; click on New.
This will reveal the option to create a new cost centre or a sub cost centre.
You must always start with a cost centre.
Add Main Cost Centre
Add the main centre name of your choosing.
The sub cost centres can now be added.

Adding a Sub Cost Centre
Once you have the main cost centre, you can begin to add sub cost centres.
Select the sub cost centre option and the cost centre list will open. Choose the cost centre you wish to use as a sub cost centre; it will be added to the list underneath the main cost centre. Add as many as required to build up the list.

Copy Cost Centres
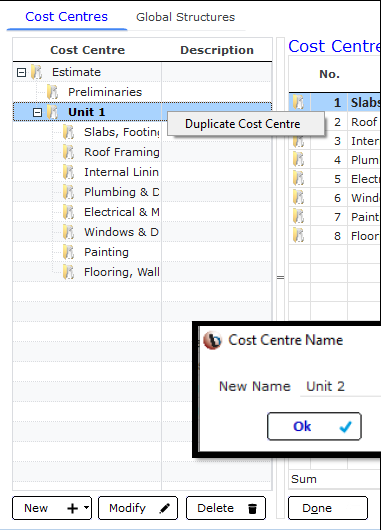
The completed cost centre along with the sub cost centres and products can be duplicated. Simply right hand mouse click the cost centre and select “Duplicate Cost Centre”
Rename the duplicate cost centre, repeat the process as many times as is needed.
Completed List
Once completed the list can be displayed; to access sub cost centres click on the + beside the main cost centre.
Then add products and items in as required to build up the cost of the project.

Suppliers
Adding a New Supplier
Begin by opening the suppliers screen
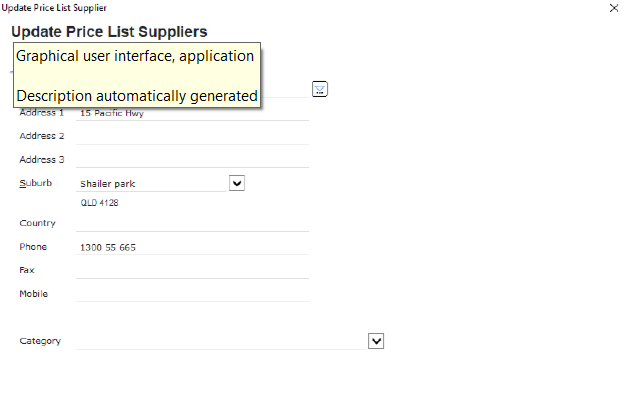
Click on the New Supplier button, opening the update suppliers screen.
Supplier Detail
Add the details of the supplier, including the name, address and contact details.
Once added click ok.
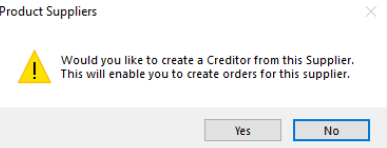
You will also have the option to add the new supplier to the Creditors list. If you will be processing orders or invoices for this supplier click yes.
Supplier List
Continue adding suppliers to the list as required.
From this screen you can also modify or delete suppliers.

Templates
Just as you may use a toolbox to organise and easily access your tools; Bizprac uses cost centres to organise and manage the products and items which are within the estimate.
An estimate can have half a dozen cost centres or it can have hundreds. There is no one rule that needs to be employed but the size of the job or project will have a bearing on the amount of cost centres you will need to use. If your company does a variety of work such as renovations, new homes or commercial work you will more than likely have a different template (spreadsheet) for each type of project.
Instead of typing in all of the cost centres you need each time a new estimate is created you can import the template list for immediate use. You can then modify the list to suit your requirements for that project. A template list is a popular basis for cost plus jobs.
We would recommend that a comprehensive master estimate is established. Add all of the cost centres you require for the majority of projects that you tender on. By adding any products or structures you will have a comprehensive standard that can be adjusted when copying.
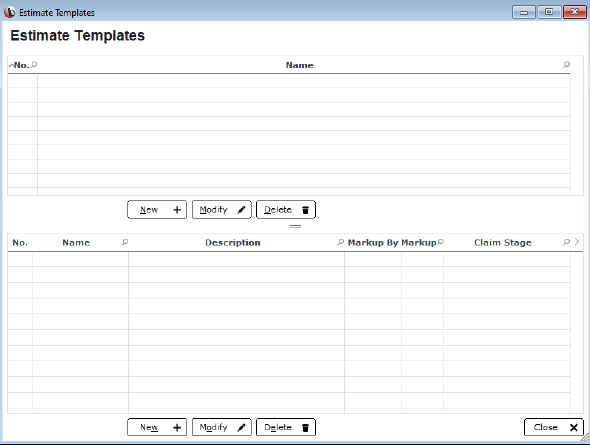
Estimate Templates
You can create as many templates as you need. At anytime they can be modified.
The cost centres contained in the template above are added below. Add or delete a cost centre as necessary. Mark ups and claim stages can also be added.
Add a Template
Number the template and give it a name. By adding the job claims template you will be able to add claim stages to each of the cost centres for a cash flow report.

Add Cost Centres
Begin adding the cost centres you wish to use.
Add as many as you need for accurate costing.
Once you have added the cost centres you can close this window.
The template is ready for use.

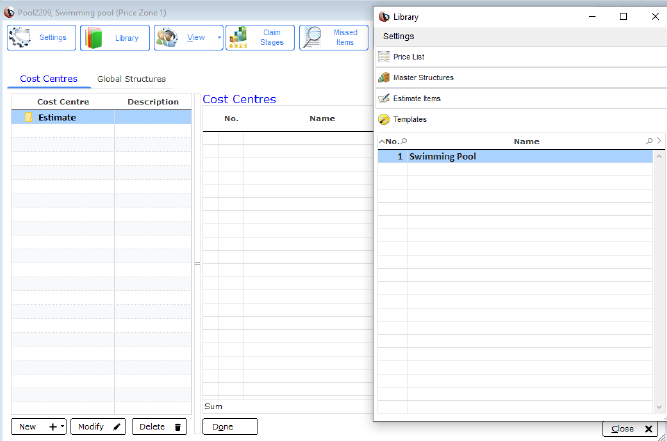
Using a Template Estimate
A template can be used to create the basis of a new estimate. Products and items can the be added to build a base estimate that can be repeatedly copied.
Start a new template and open by clicking on the trade breakup. The library will open automatically to the templates.
Drag Drop
Drag the template onto the cost centres table.
The list of cost centres will now be added.
You can then begin to add products and items as required.

Using a Template- Jobs
In the jobs screen select ‘new job’ from the drop down box select without estimate.
Add the job details on the first screen.


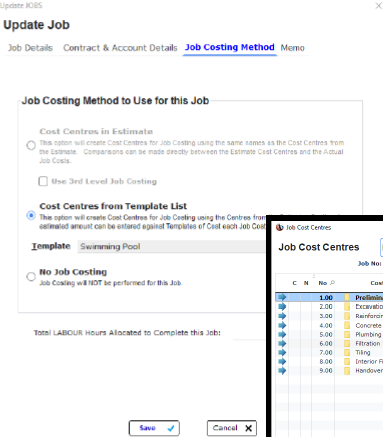
Job Costing Method
After completing the details on the first 2 tabs; select the Job costing method tab.
Select Cost centres from template list. This will bring up the list; simply select the required template.

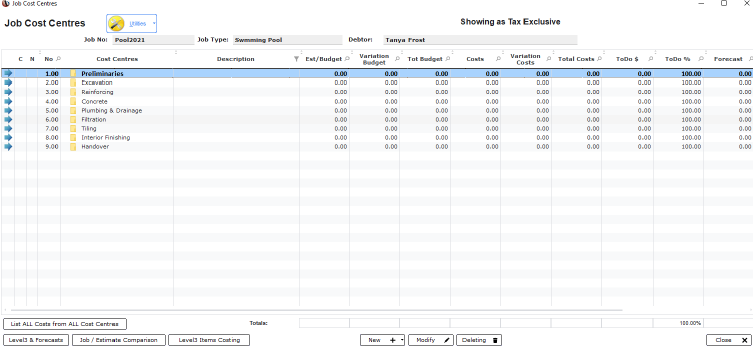
Cost Centres
Click save to finalise the job setup. The cost centres are then accessed through the blue drill down arrow.